Showing posts with label Crochet for Women. Show all posts

Saturday, July 11, 2026

Whisper Breeze Scarf. Lightweight Crochet Scarf Pattern


As much as I enjoy crocheting with cotton during the summer, this is also the time of year when I begin thinking about cozy projects for the months ahead. Many crocheters like to start their fall projects early, and this lightweight scarf is perfect for getting a head start. It's warm enough for those first cool autumn days while remaining light and comfortable to wear.


The Whisper Breeze Scarf is an easy and relaxing project featuring a simple two-row repeat that is quick to memorize. The textured stitch creates a beautiful fabric with a lovely drape, making it an enjoyable project whether you're crocheting while watching television or taking your project along on vacation.

This scarf is worked with a simple stitch pattern consisting of only two repeating rows, making it suitable for adventurous beginners as well as experienced crocheters looking for a relaxing project.

Although the stitch has a slightly different appearance on the right and wrong sides, the difference is minimal, making it an excellent choice for a reversible scarf. This versatile stitch would also work beautifully for blankets, sweaters, cardigans, and other cozy accessories.


  • Yarn: Premier Basix DK, 100% acrylic 
  • Weight: Category 3 (DK)
  • Color: Whisper Pink
  • Amount: Approximately 150 grams (about 1.5 skeins)
  • Hook: 5 mm (H)

You can substitute any similar DK-weight yarn. If you prefer a thicker, warmer scarf, you can also use a Category 4 worsted weight yarn. The stitch pattern adapts beautifully and creates a cozier fabric. 

The finished size is approximately 60 inches long and 7.5 inches wide. 


The Whisper Breeze Scarf is available as a printable PDF pattern (and the link to detailed video tutorial) in my Etsy and Ravelry shops. 


Friday, April 3, 2026

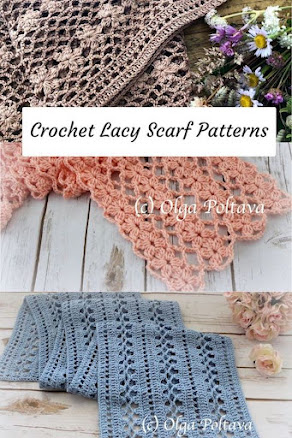
Crochet Spring Scarf Pattern. Lightweight Lace Scarf with Truboo Yarn


This delicate crochet scarf is designed especially for spring, offering a light and breathable layer that adds elegance without any heaviness. 

Worked in a soft light blue shade, the open lace pattern creates an airy fabric that feels fresh, graceful, and perfect for milder weather.


The stitch design features double crochet clusters that repeat across the width of the scarf, creating a beautiful balance between texture and openness. The result is a flowing, lightweight piece with lovely drape and movement. 

The finished scarf measures approximately 60 inches long and 7.5 inches wide, making it easy to style loosely around the neck or wear as a simple decorative accessory.


For this project, I used two skeins of Lion Brand Yarns Truboo yarn in a soft light blue color. 

Each skein is 100 grams (241 yards / 220 meters). This yarn is made from 100% rayon from bamboo, which gives it a silky texture, beautiful drape, and excellent breathability, ideal for spring and summer wear. 

It’s also easy to find on Amazon if you’d like to use the same yarn. 

Other similar lightweight yarns can work well for this pattern too, as long as they offer good drape and softness.


The finished fabric is smooth, fluid, and comfortable against the skin; it is perfect for adding a touch of style without adding warmth. 

It’s a lovely accessory for spring outfits and also makes a thoughtful handmade gift.


If you’d like to make your own scarf, the written pattern is available in my Etsy and Ravelry shops. 

The pattern includes a link to a detailed video tutorial where I guide you through each step. 


Thursday, July 10, 2025

Exciting News! The Water Lily Summer Top Pattern is Now Available


I’m thrilled to share that the written pattern for my newest design — the Water Lily Lacy Summer Top — is now available in my Etsy and Ravelry shops!

This airy and elegant top has been a true labor of love. Many of you have been eagerly waiting for the pattern, and I didn’t want you to miss the chance to make it while summer is still in full swing. 

So even though the video tutorial is still in the works, the written pattern is ready and up for grabs now!


The Water Lily Top is worked with a beautiful and delicate lace stitch that reminds me of floating water lilies; that’s how it got its name. The stitch creates a lovely texture and drape, and it's available in 11 custom sizes, from XS to 5XL.

Because this lace design depends on full stitch repeats (you can’t just add half a repeat), I developed a special sizing system to preserve the stitch integrity while keeping everything proportional. 

The pattern has already been professionally tech edited, ensuring that it's clear, consistent, and beginner-friendly for those familiar with garment-making.


To ensure everything works as intended, I crocheted the top myself in three different sizes: XS, Small, and XL. I wanted to be 100% sure that the proportions work across different bodies — and they do!

Currently, another talented crocheter is testing the pattern in a Plus Size. Since that’s a larger project, it might take her some time to finish. But because so many of you have reached out wanting to make the top before summer ends, I decided to go ahead and release the pattern now.

The fair market value for a crochet garment pattern like this, worked in a complex lacy stitch and fully graded across all sizes is around $8 on Etsy and Ravelry. 

However, for this early release, I’m offering the pattern at a special price of $5.49.

Once the video tutorial is published, the pattern price will increase to reflect its full value. So if you’d like to make this stunning summer top and save a bit in the process, now is the perfect time to get your copy! You can always redownload the updated version from Etsy or Ravelry!


A video tutorial for the main lace stitch is already available on my YouTube channel, and the full step-by-step garment tutorial is coming soon!

Everything you need to crochet the Water Lily Top is included in the pattern, so you can get started with confidence!

You also have my 100% support! If you have any questions or need help at any point, just reach out and I’ll be happy to assist you.

Happy crocheting! 

Buy this pattern on Etsy

Buy this pattern on Ravelry


Saturday, June 28, 2025

Sneak Peek: Water Lily Crochet Summer Top + Free Stitch Tutorial


Friends, I’m so excited to finally share a glimpse of my newest design — the Water Lily Crochet Summer Top! 

This lacy, lightweight garment has quickly become one of my favorite creations, and I think you're going to love it too.


The stitch pattern is light, delicate, and just breezy enough for summer — and the way it flows reminds me of blooming water lilies dancing on a quiet pond. That’s how this top got its name — graceful, airy, and effortlessly feminine.


While I’m still putting the finishing touches on the written pattern and step-by-step video tutorial, I’ve already shared a demo of the main lacy stitch used in the top on my YouTube channel. 

You can start learning the stitch today, try it out, and even begin swatching for your perfect size.


It’s simple to learn and so versatile — perfect for summer tops, shawls, scarves, or whatever project you dream up.

If you're already dreaming about making your own Water Lily Top, you can start by:

  • Watching the tutorial

  • Choosing your yarn (I used Alize Cotton Gold, 55% cotton / 45% acrylic)

  • Grabbing a G (4.25 mm) hook

  • Making a swatch and getting familiar with the stitch repeat


The pattern is now in the hands of a professional technical editor, and once that step is complete, it will be tested in multiple sizes to make sure it fits and looks great on real women.

After that it will be available in my Etsy and Ravelry shops!

This piece is perfect for warm days — breezy, elegant, and light on the skin. Whether you wear it over a tank, dress it up for brunch, or throw it on with jeans, it’s the kind of handmade garment that gets noticed (and asked about!).

Monday, June 23, 2025

Mesh and Puff Stitch Shawl, Free Crochet Pattern


I’m excited to share one of my older designs with you — now available for free here on the blog! This shawl pattern was originally created back in March 2016, and it holds a special place in my crochet journey. 

It’s worked with worsted weight yarn and a 4.25 mm (G) hook, making it a cozy yet airy accessory that’s perfect for layering. The combination of mesh and puff stitches gives it beautiful texture and drape, while keeping the project interesting and fun to make. I hope you enjoy revisiting (or discovering!) this classic pattern.


Lace Puffs Crochet Shawl Pattern
Olga Poltava © March, 2016


This pattern is written using US crochet terminology.


Finished Measurements: approximately 74 inches wide and 34 inches long (not including fringe)


Skill Level: Advanced beginner


Materials:
US Hook size G/6 (4.25 MM)
Worsted yarn, about 820 yards


For the shawl shown above I used Caron Simple Soft Party, 5 balls (3 oz each ball)


Gauge: not important


Abb
reviations:
ch chain
sc single crochet
dc double crochet
sl st slip stitch
puff: (yarn over, insert hook and draw a loop) in the same space 4 times, yarn over and draw yarn
through eight loops, holding the 9th loop on the hook, then yarn over and draw yarn through two loops.
* * Instructions between asterisks should be repeated as many times as there are stitches to accommodate them.


Ch 3, join in ring with sl st.

Row 1: ch 8 (counts as 1st dc and ch-5), dc in ring, ch 5, dc in ring.

Row 2: ch 8, turn (counts as 1st dc and ch-5); sc in next ch-5 space, ch 5, dc in next dc, ch 5, sc in next ch-5 space, ch 5, dc in 3rd ch of turning ch-8. (Here and in every following row, remember that we treat each 
turning ch-8 as a dc and ch-5)

Row 3: ch 8, turn (counts as 1st dc and ch-5); sc in next ch-5 space, ch 2, puff in next sc, ch 2, sc in next 
ch-5 space, ch 5, dc in next dc, ch 5, sc in next ch-5 space, ch 2, puff in next sc, ch 2, sc in next ch-5 
space, ch 5, dc in 3rd ch of turning ch-8.

Row 4: ch 8, turn (counts as 1st dc and ch-5); sc in next ch-5 space, ch 5, sc in top of next puff, ch 5, sc in 
next ch-5 space, ch 5, dc in next dc, ch 5, sc in next ch-5 space, ch 5, sc in top of next puff, ch 5, sc in next 
ch-5 space, ch 5, dc in 3rd ch of turning ch-8.


Row 5: ch 8, turn (counts as 1st dc and ch-5); sc in next ch-5 space, ch 2, puff in next sc, ch 2, sc in next 
ch-5 space, ch 5, sc in next ch-5 space, ch 2, puff in next sc, ch 2, sc in next ch-5 space, ch 5, dc in next
dc, ch 5, sc in next ch-5 space, ch 2, puff in next sc, ch 2, sc in next ch-5 space, ch 5, sc in next ch-5 space, 
ch 2, puff in next sc, ch 2, sc in next ch-5 space, ch 5, dc in 3rd ch of turning ch-8.

Row 6: ch 8, turn (counts as 1st dc and ch-5); sc in next ch-5 space, ch 5, *sc in top of next puff, ch 5, sc in 
next ch-5 space, ch 5* across to middle dc, dc in next dc, ch 5, sc in next ch-5 space, ch 5, *sc in top of
next puff, ch 5, sc in next ch-5 space, ch 5* across to end, dc in 3rd ch of turning ch-8.

Row 7: ch 8, turn (counts as 1st dc and ch-5); *sc in next ch-5 space, ch 2, puff in next sc, ch 2, sc in next 
ch-5 space, ch 5* across to middle dc, dc in next dc, ch 5, *sc in next ch-5 space, ch 2, puff in next sc, ch
2, sc in next ch-5 space, ch 5* across to end, dc in 3rd ch of turning ch-8.


Continue crocheting Rows 6-7 increasing the amount of ch-5 spaces and puffs in each row, until your 
triangle measures about 33 inches long, ending with Row 6.

Crochet one row of sc across the longest side of the triangle, make 2 sc in each ch-space. Fasten off.

Fringe:

Cut yarn into strands 16 inches long.

Lay shawl on a flat surface. Take two strands of yarns at a time and attach fringe into every ch-5 space of the edging. Then tie the fringe into knots as shown in the picture below.


Saturday, June 14, 2025

Designing Crochet Beach Coverup, From Sketch to Finish

Hi friends!

I’m so excited to share the full story behind my latest summer crochet project — a lacy beach or swim coverup that I designed and made from scratch. 


This piece took me on a real creative journey: it started with a simple sketch, turned into a full-on design challenge.

I used Herrschners Self-Striping Cotton Cake yarn for this coverup — it’s 100% cotton and perfect for summer wear. 

Partway through the project, I ran out of yarn in my original colorway, so I ended up combining it with a second colorway. 

The stitch I used is light, lacy, and super breathable — ideal for summer layers. 

I walk through the entire process in my video, from the rough sketch and design decisions to yarn substitutions and the moments where I had to fix things and keep going.


Curious about the stitch I used? You can learn it in my tutorial here:


If you’d like to support my work or browse more of my summer crochet patterns, you can find them here:

This project definitely tested my patience (especially during the yarn shortage moment!), but I’m so glad I stuck with it. 

If you’ve ever hit a wall in a project or had to get creative to finish something — you’ll definitely relate. And I hope this encourages you to keep going when your project doesn’t go exactly as planned… 

Thanks so much for reading and watching — and happy summer crocheting! 🌸

Sunday, June 8, 2025

Inspired by Angelina Jolie’s Crochet Robe in Maria — Here’s the Vintage Pattern I Found


Hi friends, I just had to share this!

I recently watched the movie Maria, starring Angelina Jolie — and completely fell in love with the crochet robe she wears in the film. The rich texture, the bobbles, and the dramatic godets give the robe such a striking and elegant look — it caught my eye immediately.

After looking closely and doing some research, I believe I found the vintage pattern from which the robe Angelina wore in the movie was created. 

In the film version, the robe was worked in a thicker yarn, giving the fabric a chunkier and more sculptural feel. The bobbles stand out more prominently, and the overall drape is heavier and more dramatic.

Another difference I noticed: in the original pattern, the godets (triangular inserts) on the sleeves are placed on the back of the sleeves, starting from the elbow and flowing downward. 

In Maria’s robe, the godets are inserted on the front of the sleeves, which changes the silhouette. The sleeves in the movie version are also longer than those in the original design.

For this post, I am presenting the vintage pattern exactly as it was originally written. 

A quick note: the pattern is written in UK crochet terms — so "double crochet" means single crochet, and "treble" means double crochet in US terms. Keep that in mind!


To fit a 32 [34, 36, 38] in. bust. Instructions for larger sizes are given in square brackets. 


Materials 

31 [32, 33, 34] (50g) balls of Jaeger Spiral-spun. 


No. 3.50 (9) and No. 3.00 mm (11) crochet hooks. 12 small buttons. 


Measurements

Length from top of shoulders (approx.) 52 [52, 52 1/2, 52 1/2] in.; sleeve seam, 16 1/2 in. all sizes. 


Tension 

1 repeat of pattern measures 1 in. across.


Note

Test tension before starting garment and change to a larger or smaller size hook if necessary. 


Abbreviations 

ch. = chain; d.c. = double crochet; tr. = treble; s.s. = slip stitch; st. = stitch; rep. = repeat, patt. = pattern; in. = inches. 


RIGHT FRONT

(Worked in two pieces up to top of godet.)


SIDE PANEL

With No. 3.50 hook, make 25 [30, 30, 30] ch. and work in patt. as follows: -

**1st row - (Right side), 1 tr. in 4th ch. from hook, 1 tr. in next ch., *3 ch., miss 2 ch., 1 tr. in each of next 3 ch., rep. from *to end. 


2nd row - 3 ch., *miss 3 tr. and 1 ch., 7 tr in next ch., miss 1 ch., rep. from * to last 3 sts., miss 2 sts., 1 tr. in top of turning ch. 


3rd row - 3 ch., 1 tr. in each of first 2 tr., * 3 ch., miss 4 tr., in each of next 3 tr., rep from *working last tr. in top of turning ch. 2nd and 3rd rows from patt. ***


Continue straight in patt. until work measures 37 in., ending with a 2nd row.**


Fasten off. 


CENTRE FRONT PANEL


With No. 3.50 hook, make 25 [25, 25, 30] ch. and work as for Right Front Side Panel from ** to **. 

Do not fasten off. 


***Join panels as follows: - 

Next row - (Right side facing), work as 3rd patt. row to last 6 tr. and turning ch., 3 ch., miss 5 tr., 1 tr. in next tr., 1 tr. in turning ch., miss first tr. of side panel, 1 tr. in next tr., 3 ch., miss 4 tr., 1 tr. in each of next 3 tr., patt. to end. 

Continue straight in patt. until work measures approx. 45 in., ending with wrong side facing for next row.***


Shape square armhole as follows: - 

Next row - S.s. across 12 [12, 12, 18] tr. and ch. (each ch. counts as 1 st.), then into next tr., 3 ch., patt. to end.


Continue straight until Front measures approx. 49 1/2 in., ending with wrong side facing for next row. 


Shape neck as follows: - 

Next row - Patt. up to last 15 sts., miss next 2 tr., 1 tr. in next tr., turn. 

Next row - 5 ch., miss 6 tr., 3 tr. in next 3 tr., patt. to end. 

Next row - Patt. to last 3 tr. and 5 ch., miss 3 tr. and 1 ch., 4 tr. in next ch., turn. 

Next row - Miss first tr., s.s. in next tr., 3 ch., (miss next tr., 1 tr. in next tr.) twice, patt. to end. 

Continue straight in patt. until Front measures approx. 52 [52. 52 1/2, 52 1/2] in., ending with a 3rd patt. row.

Fasten off. 


LEFT FRONT 

Centre Front Panel 

With No. 3.50 hook, make 25 [25, 25, 30] ch. and work as for Right Front Side Panel from ** to **. 

Fasten off. 


Side Panel

With No. 3.5 hook, make 25 [30, 30, 30] ch. and work as for Right Front Side Panel from ** to **. 

Do not fasten off. 

Work as Right Front from *** to *** noting that centre panel will be worked across in place of Side Panel. 


Shape square armhole as follows: - 

Next row - Patt. to last 12 [12, 12, 18] tr. and ch., turn. 

Continue straight until work measures same as Right Front up to neck shaping, ending with wrong side facing for next row. 


Shape neck as follows: - 

Next row - S.s. across 12 tr. and ch., then into next tr., 3 ch., patt. to end. 

Next row - Patt. up to last 6 tr. and turning ch., 2 ch., 1 tr. in top of turning ch., turn. 

Complete to match Right Front, reversing shapings. 


BACK

(Worked in 3 pieces up to top of godets.)


Left Side Panel

With No. 3.50 hook, make 25 [30, 30, 30] ch. and work as Right Front Side Panel from ** to **. 

Fasten off. 


Centre Back Panel

With No. 3.50 hook, make 45 [40, 45, 50] ch. and work as Right Front Side Panel from ** to **.

Fasten off. 


Right Side Panel 

Work as for Left Side Panel of Back. 

Do not fasten off. 


Join panels as follows: - 

Next row - (Right side facing), work as 3rd patt. row to last 6 tr. and turning ch., 3 ch., miss 5 tr., 1 tr. in next tr., 1 tr. in turning ch., miss first tr. of Centre Back Panel, *1 tr. in next tr., 3 ch., miss 4 tr., 1 tr. in each of next 3 tr.*, patt. to last 6 tr. and turning ch., 3 ch., miss 5 tr., 1 tr. in next tr., 1 tr. in turning ch., miss first tr. of Left Side Panel, work from * to *, patt. to end. 


Continue straight until Back matches Fronts at side edge, ending with wrong side facing for next row. 

Shape square armholes as follows: - 

Next row - S.s. across 12 [12, 12, 18] tr. and ch., then into next tr., 3 ch., patt. to last 12 [12, 12, 18] tr. and ch., turn. 

Continue straight until Back matches Fronts at armhole edge, ending with a 3rd patt. row. 

Fasten off. 


SLEEVES

1st portion - With No. 3.50 hook, make 40 [40, 45, 45] ch. and work as for Right Front Side Panel from ** to ***. 

Continue straight in patt. until work measures 10 1/2 in., ending with a 2nd row. 

Fasten off. 

2nd portion - Work as first portion but do not fasten off. 


Join portions as follows: - 

Next row - (Right side facing), work as 3rd patt. row to last 6 tr. and turning ch., 3 ch., miss 5 tr., 1 tr. in next tr., 1 tr. in turning ch., miss first tr. of 1st portion, 1 tr. in next tr., 3 ch., miss 4 tr., 1 tr. in each of next 3 tr., patt. to end. 

Continue straight in patt. until work measures 18 1/2 [18 1/2, 18 1/2, 19 1/2] in., ending with a 3rd row. 

Fasten off. 


SKIRT GODETS (4)

With No. 3.50 hook, make 3 ch. and work 1 tr. in first ch., turn. 

Next row - 3 ch., 1 tr. in first st., 1 tr. in turning ch.

Next row - 3 ch., 1 tr. in first st., 1 tr. in each of next 2 sts. (4 sts.).

Next row - 3 ch., 1 tr. in each st. to end. 

Rep. last row once more. 

Next row - 3 ch., miss first st., 2 tr. in next st., 1 tr. in each st. to last 2 sts., 2 tr. in next st., 1 tr. in turning ch. 


Rep. last 2 rows until Godet measures 37 in. down centre. 

Fasten off. 


SLEEVE GODETS

Work as Skirt Godets, but noting that final measurement should be 10 1/2 in. only.


COLLAR

With No. 3.50 hook, make 78 [83, 83, 88] ch. 

1st row - (Right side), 1 d.c. in 2nd ch. from hook, 1 d.c. in next ch., *3 ch., miss 2 ch., 1 d.c. in each of next 3 ch., rep. from * to end. 

2nd row - 3 ch., *miss 3 sts., and 2 ch., 7 tr. in next ch., miss 1 ch., rep. from * to last 3 sts., miss 2 sts., 1 tr. in turning ch. 

3rd row - 3 ch., 1 tr. in each of first 2 sts., *3 ch., miss 4 sts., 1 tr. in each of next 3 sts., rep. from * to end. 

Rep. 2nd and 3rd rows twice more. 

Place a marker at each end of last row. 


Change to No. 3.00 hook

Next row - 3 ch., miss first tr., 1 tr. in each tr., and ch. to end. 

Next row - 3 ch., miss first st., 1 tr in each st. to end. 

Rep. last row until portion from marker measures same as patt. portion.

Fasten off.


MAKE UP AND BORDER

Press Godets and tr. portion of Collar only with a warm iron and damp cloth. 

Join shoulders. 

Stitch foundation edge of Collar to neck edge. 

Fold tr. potion at markers to wrong side and slip stitch into position. 

Tack front edges of Collar together. 

Sew in Godets as in photograph. 


Front Border 

First mark position for 12 buttonloops on Right Front, one to come level with each end of three 2nd patt. rows on Collar, and 9 level with end of each 2nd patt. row below. 

With No. 3.00 hook, rejoin yarn to top of left point of Collar and taking special care not to stretch edges work 1 row d.c. along left front, lower and right front edges, turn. 

Next row - As previous row but increasing 1 st. in each of lower corners and working a buttonloop to correspond with each of 12 markers as follows: 2 ch., miss 2 d.c., 1 d.c. in next d.c. 


Join sleeve seams leaving to 2 [2, 2, 3] in. free.

Insert Sleeves, stitching portions left free to armhole shapings. 

Press seams. 

Sew on buttons.