Friday, December 7, 2012

Reindeer Filet Crochet Doily

The pattern for this filet crochet doily was nothing else but a picture from an old gift bag. When I came across it last year, I thought that I’d better save it as it can easily be used as a pattern for cross-stitching or filet crochet.


I used it for both. The cross-stitch reindeer design was perfect for a small Christmas card. And a matching filet crochet doily only took two evenings to make. I didn’t have much time to come up with any fancy edging, so I just used two rounds of shells.


This will be my last post this year as I’m taking a holiday break from both crocheting and blogging until January.

Happy Holidays!

Friday, November 30, 2012

My New Warm and Comfy Boot Inserts


I recently bought a lovely 100% wool dress in a gorgeous shade of purple called Byzantium. It’s my favorite garment this autumn. It looks great with boots and black tights, but I felt like that outfit needed more accessories in the same color palate.
Boot inserts came to mind!


I’ve seen so many beautiful and chic ones on Pinterest; I especially liked knitted ones with cables. But since it has been a few years since I held knitting needles, I decided to go with crocheted ones.

I used Vickie Howell Sheep(ish) yarn (70% acrylic, 30% wool), Plum(ish) color and E/4-3.50MM hook. One ball was enough.


I started with ch 28 loosely. Sc in back ridge of second ch from hook and in each ch across (27 sc), ch 1 turn.


Then just sc in back loop only of each sc across (27 sc), ch 1 turn. I repeated this row until I got a piece long enough to fit around my calf (40 rows in total). 


I folded the piece in half, right side inside, and stitched together using sc. Fastened off and turned the right side out.


More patterns for women from my shop:


Wednesday, November 28, 2012

Wrist Warmers for a Little Girl

For these lacy wrist warmers I used Red Heart Shimmer white (snow) yarn and size 4 (3.5 mm) hook. These wrist warmers would fit a 7-8 year old girl.


Ch 30  

Row 1: Sk 4 ch, *2 dc tog in next 2 ch, (1 dc, ch 3, 1 dc) all in next ch, sk 2 ch * five times, dc in last ch. Ch 3, turn.

Row 2: (3 dc tog, ch 3, 1 sc) all in next 3-ch space, *ch 2, (3 dc tog, ch 3, 1 sc) all next 3-ch space, * four times, dc in 3rd ch of turning ch-3. Ch 3, turn.

Row 3: (3 dc tog, ch 3, 1 sc) all in next 3-ch space, * ch 2, sk next ch-2 space, (3 dc tog, ch 3, 1 sc) all in next 3-ch space, * four times, dc in 3rd ch of turning ch-3. Ch 3, turn.  

Rows 4 – 10 same as Row 3.

Stitch together the longer sides leaving a hole for the thumb.  

I'm linking to 
What's It Wednesday @ Ivy and Elephants,
Whatever You Want Wednesday @ Free Pretty Things
Clever Chicks Blog Hop @ The Chicken Chick

Thursday, November 22, 2012

Happy Thanksgiving


I want to wish a wonderful Thanksgiving to the USA readers of Lacy Crochet! 

And since it’s the day of thankfulness, I want to express my gratitude to all my readers around the world. Your visits, comments and e-mails are my biggest motivation for writing this blog. 

Thank you!

Wednesday, November 21, 2012

Mini Christmas Wreath Free Pattern


These mini wreathes are only slightly bigger than an inch in diameter. They are easy and quick to make. It took me only ten minutes to make one.

They will be great for Christmas card making, decorating wrapped presents, or as Christmas tree ornaments (just add a string for hanging). You can also use a pin and wear one as a Christmas brooch.  

Size ten green and red cotton thread. Size ten hook.

Using green thread, ch 15, join with a sl st in first ch to form a ring.

Round 1: ch 1, 25 sc in ring, join with sl st in first sc.

Round 2: ch 1, sc in next sc worked in back loop around, join with sl st in first sc.

Round 3 same as Round 2. Fasten off.

Using red thread, ch 45. Fasten off. Tie the chain into a bow. Using a needle and red thread, attach the bow to the wreath.

If you don’t know how to crochet into back loop, learn about it here.  


Friday, November 16, 2012

Holiday Gift Wrapping with Doilies

Have you started your holiday shopping? What about holiday gift wrapping? I have started both as I don’t want to be overwhelmed by these tasks as the Holidays approach.


I hardly ever buy gift wrapping paper as there are so many materials in my home that can be used for that purpose.


For instance, I used a brown paper bag to wrap these three presents. I added small doilies and a few other simple decorations that I found in my storage box labeled “Christmas Decor”. And voila! The presents are now awaiting their recipients.


The symbol chart for this doily can be found in my old post here.


And you can see the symbol charts for the other two tiny doilies here (designs 1 and 2). 

For those of you in the USA, please check out my tabletop fountain giveaway on my other blog.

I'm linking to Show and Tell Friday @ My Romantic Home and  Link Your Stuff @ Annamarie's Haakblog

Monday, November 12, 2012

Small Autumn Doily


I am so enjoying autumn this year. It’s fun to walk around the neighborhood, to look at the trees changing colors, and all the beautiful fall decorations people put out. On our morning walk today my children and I picked some leaves.

I thought those leaves were a perfect complement for my new doily.

I stumbled upon the symbol chart for this doily on Facebook. I couldn’t figure out how the last two rounds are supposed to be crocheted, so I finished my doily a bit differently.  

I'm linking to
Make It Pretty Monday at The Dedicated House,
Make the Scene Monday at Alderberry Hill
Craft-O-Maniac Monday at Craft-O-Maniac

Tuesday, November 6, 2012

Lacy Crochet is One Year Old

This month I’m celebrating Lacy Crochet’s first anniversary!

It is through this blog that I met many wonderful and talented people from around the world who share the love of crocheting. I appreciate you visiting my blog and all the support and encouragement you give me!

I must say it has been a productive crochet year for me. Before I started this blog, I could only follow symbol chart patterns or written instructions in Russian (my native language).  But once I started this blog, I learned the English crochet language and completed many projects following patterns written in English.

What is more, I even wrote several patterns myself! Yes, I definitely expanded my crochet knowledge this past year. 

I collected some of my favorite crochet works from the past year in these collages.


Thursday, November 1, 2012

Little Bear Toddler Beanie, Free Pattern

This is not at all a lacy project, but I thought it was worth sharing.


It seems that autumn finally arrived in California too. And it’s time to bring out warmer clothes and hats for little ones!

I made this beanie for my eighteen months old son. I came up with the pattern myself. It’s not at all elaborate, which makes it easy to crochet. I believe even beginning crocheters can make it.  

This pattern is my original design. It cannot be posted on other sites or distributed in any other form. If you would like to share this pattern, you can post ONE image on your site with the link to my original post. You can use this pattern to make items for personal use or for sale. If you sell finished items from this pattern, you must give design credit to Lacy Crochet blog (lacycrochet.blogspot.com). Please, respect my work. Thank you!

The hat measures 16 inches at the crown. 

I used Country yarn by NaturallyCaron.com. The color was Deep Taupe (#15). It’s a 75% acrylic and 25% merino wool mix. The hook was 3.5 mm.


Ch 5, join with sl st to form a ring.

Round 1: ch 3, 11 dc in ring, join with sl st in the third ch of beg ch-3.

Round 2: ch 3, dc in same space, *2 dc in next dc* around, join with sl st in the third ch of beg ch-3.

Round 3: ch 3, 2 dc in next dc, *dc in next dc, 2 dc in next dc* around, join with sl st in the third ch of beg ch-3.

Round 4: same as Round 3.

Round 5: ch 3, dc in each dc around, join with sl st in the third ch of beg ch-3.

Rounds 6-14: as Round 5.

Round 15: ch 1, *sc in space between next 2 dc* around, join with sl st in the beg ch-1.

Round 16: ch 1, *sc in next sc* around, join with sl st in beg ch-1. Fasten off.

To make ears:

Ch 7, ring.

Round 1: Ch 3, 15 dc in ring, join with sl st in the third ch of beg ch-3.

Round 2: Ch 3, dc in each dc, join with sl st in the third ch of beg ch-3.

Round 3 as Round 2.

You will have a tiny hat. Stitch the opening together using sc. Fasten off. Cut the yarn leaving it long enough to attach the ear to the hat.

Using a tapestry needle, attach the ears to the hat.

I'm linking to
Make It Pretty Monday @ The Dedicated House,
Home Sweet Home Friday @The Charm of Home,
Show and Tell Friday @ My Romantic Home,

Tuesday, October 30, 2012

Oh No!


What a disappointment! I ran out of yarn for this baby blanket. I wanted to make a square one, but even a rectangular one would do if only the pattern was running along the length, not the width (if you know what I mean).


I used Pound of Love yarn by Lion Brand. I could probably buy another skein of yarn, but it wouldn’t be from the same lot, so the color could be slightly different. Besides, I wanted to create a baby blanket pattern that would require only one skein (one pound).


I’ll have to rip it all out and start again using another stitch. This stitch is pretty, but for my blanket I will need something lacier!


I am sharing the pattern for this puffy stitch as some of you might want to use it. Just keep in mind that it requires more yarn.


Puff in this pattern: (yo, insert hook, draw up a loop) 4 times in same ch, yo, draw through 9 loops


Multiple of 6 ch plus 4


Row 1: sk 3 ch, *(1 dc, ch 2, 1 dc) in next ch, sk 2 ch, 1 puff, ch 1, sk 2 ch*, (1 dc, ch 2, 1 dc) in last ch. Ch 3, turn.


Row 2: *1 puff in 2-ch sp between 2 dc of previous row, ch 1, (1 dc, ch 2, 1 dc) under loop that closes the puff in previous row*, 1 puff, 1 dc in 3-ch sp at beg of previous row. Ch 3, turn.


Row 3: (1 dc, ch 2, 1 dc) in top of puff, *1 puff in 2-ch space, ch 1, (1 dc, ch 2, 1 dc) in top of puff*, 1 dc in 3-ch sp at beg of previous row. Ch 3, turn.


Repeat from Row 2.

I'm linking to Teach Me Tuesday Link-Up at Growing Home

Thursday, October 25, 2012

Crochet Tealight Candle Holders, Free Pattern


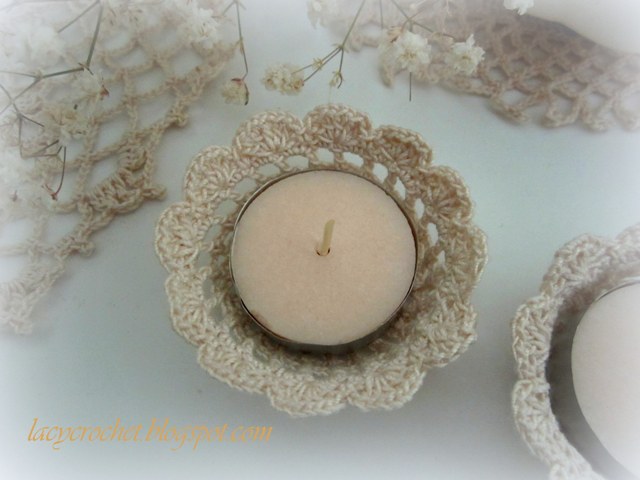
These votive candles in cute holders along with some doilies, small white pumpkins, and dry baby-breath flowers adore the dresser in my bedroom.


I like to decorate with votive candles, as they are quite inexpensive (especially if buying in bulk). However, I felt that my votive candles needed some charm. So I came up with these lovely crocheted holders.

They are extremely easy and quick to make. They require very little thread, so you can use your leftover thread from other projects. I made mine in fawn color. But I can imagine they will look stunning in black for Halloween or in red for Valentine’s Day. 


This is my own pattern. I didn’t have anyone test it, so if you find any errors, please let me know. Also if you have any questions about the pattern, don’t hesitate to ask.

I used size ten thread and size ten hook (1.30 mm)

Shell in this pattern: {(dc, ch 1) 4 times, dc} all in the same space


Ch 8, join with a slip stitch to form a ring.


Round 1: Ch 3 (counts as dc), 23 dc in ring; join with a slip st in third ch of beginning ch-3.


Round 2: Ch 4, *dc in next dc, ch 1, repeat from * around; join with a slip st in third ch of beginning ch-4.


Round 3: Ch 6, *dc in next dc, ch 3, repeat from * around; join with a slip st in third ch of beginning ch-6.


Round 4: Ch 5, *dc in next dc, ch 2, repeat from *around; join with a slip st in third ch of beginning ch-5.


Round 5: same as round 4.


Round 6: Ch 1, 2 sc in each ch-2 space around; join with a slip st in beginning ch.


Round 7: Ch 4, (dc, ch, dc) all in same st, sc in st above next dc, *shell in st above next dc, sc in st above next dc * 11 times, (dc, ch 1, dc) all in same st as beginning ch-3; join with a slip st in third ch of beginning ch-4.


Fasten off.  


I'm linking to
Make It Pretty Monday at The Dedicated House,
Home Sweet Home Friday @The Charm of Home,
Show and Tell Friday @ My Romantic Home,


Friday, October 19, 2012

Thread Appliques, Symbol Charts


Thread appliques can be used in many ways. They can adore pillow cases, cushion covers, little girls’ dresses, tote bags, etc. They can also be used for card making. The possibilities are endless.


I came up with these five designs, though I don’t know yet what I’m going to use them for.

In the November issue of Country Living (on page 97) I saw a pretty linen cushion with a white fern design on it. I might attempt making something similar using #4 and/or #5 designs.

I made symbol charts as it was much easier than writing instructions. I don’t have a special symbol chart making software, so I just drew them by hand. I know not everyone can use/understand symbol charts, but I hope they will be useful to those who can.


I'm linking to  Show and Tell Friday @ My Romantic Home,
Link Your Stuff at Annamarie's Haakblog

Saturday, October 13, 2012

Doilies and Tea

If you follow my blog, you must know how much I love to crochet doilies. But I love using my doilies just as much as I love to crochet them. 


One of the ways I use my doilies is for tea settings. Sometimes when my youngsters take their naps, I treat myself to a cup of tea. I love to make a small occasion out of it. I brew a cup of tea, allow myself a small (and sometimes not so small) sweet treat, and use one of my doilies to make a pretty setting. Occasionally I would add a good book as well!
That’s my idea of relaxing half an hour. 

I want to share some of the pictures of my tea festivities.

A beige doily on snow white tablecloth looks very dainty. 

A small pineapple doily that my mom made for me.


The same doily as above. 


These are not really doilies. They look more like lacy placemats. I have two of them; made by my mom.


A medium-sized blue doily on white tablecloth.


And a small violet doily.

I'm linking this post to 
Link Your Stuff at Annamarie's Haakblog

Sunday, October 7, 2012

Doily of the Week #35


Here is a very simple doily. It only took me a couple of evenings to crochet it.  

The pattern (symbol chart) was from the French crochet magazine 1000 Mailles Crochet Givre Le Crochet Facile #52.

I'm joining Saturday Show Off link party at The Rosegarden in Malevik.  

Friday, October 5, 2012

October Project

My main crochet project for this month is a baby blanket. Crocheting for babies is always so enjoyable. I don’t know yet who this blanket will be for. Obviously, it’s going to be for a little princess.

My sister-in-law is expecting, but we don’t know the gender yet. I hope she’ll have a little girl.


I’m not following any patterns but trying to come up with my own. I make notes along crocheting and if this blanket turns out pretty enough, I will gladly share the pattern with everyone.

Sunday, September 30, 2012

Doily of the Week #34

Today I finished this black doily. Perfect timing as Halloween is only one month away!


I’m going to use this doily as a centerpiece. I placed the doily on a charger plate and added a ceramic pumpkin that I bought last year from a dollar store. I might replace the pumpkin with a real one and add more details.


I’m very pleased with the way this doily turned out.

Unfortunately, the link to the pattern doesn't work anymore.

I'm linking to Make It Pretty Monday at The Dedicated House,
Show and Tell Friday @ My Romantic Home

Wednesday, September 26, 2012

I’m Back to Blogging and Crocheting

Hello! I am back from my two-week vacation in Europe. It was a lot of fun, but it’s nice to be home now. I have many crochet projects on hold. But before I can get to them, I have lots of house chores to do.


I took the picture above in a beautiful tea room in Krakow, Poland. That pineapple doily looks quite charming.

If you would like to read about the places I traveled to, visit my other blog.

Monday, September 24, 2012

Doily of the Week #33

This doily is called Autumn Reflections. The original one was made in yellow, and it did remind me of autumn. I made mine in white and as I look at it, I think about the summer that is almost over. So I refer to this doily as Summer Farewell.


The pattern is here -->  Autumn Reflections Doily Free Pattern

Monday, September 17, 2012

Doily of the Week #32


Doily of the Week is back, but I am away on vacation. I have this and another doily post to be posted automatically.


This small doily is extremely simple and easy to make. But sometimes the simplest things are the most charming.


Ferris Wheel Doily Free Pattern (it's a vintage pattern from A Book of Crochet, Book #52, 1935)


Ch 8, join with sl st, ch 5. 1st rnd: 23 tr under ring, join to ch-5 with sl st. 2nd rnd: Ch 5, s c in top of every other tr with ch-5 between, ch 5. 3rd rnd: 3 tr under each ch-5 with ch-3 between, ch 3, s c under ch-5, ch 5. 4th rnd: S c in each 2nd tr and under each ch-3, with ch-5 between, ch 5. 5th to 8th rnds incl: S c under each ch-5, with ch 5 between; sl st to next ch-5, ch 5.

9th rnd: 5 tr under each ch-5, with ch-3 between (count 1st ch-5 as 1 tr), ch 3, sl st under 1st ch-5, ch 5. 10th rnd: S c in each 3rd tr and under each ch-3, with ch-5 between, ch 5. 11th to 13th rnds incl: S c under each ch-5, with ch-5 between. 14th rnd: S c under each ch-5, with ch-7, s c in 3rd ch from hook, ch-4 between. This doily may be made larger if desired by increasing the number of ch-5 rows before the final picot edge.


Monday, September 10, 2012

Clone Knot


The pattern for hydrangea flowers in my previous post requires making a clone knot for the center of the flower. That was a new crochet stitch for me. I searched the Internet in hope to find a good tutorial. Usually the video ones are the best for me. However, clone knot videos that I found on Youtube didn’t make any sense to me.

I searched the Internet farther in hope to find good written instructions. The only article that was useful to me was from this blog.

I believe there is more than one variation for clone knot. The one I learned worked fine for my hydrangea flowers.

How to Make a Clone Knot


Thursday, September 6, 2012

Better Hydrangea Flowers

I want to thank you for your comments and suggestions on how to improve my hydrangea flowers. Alipurr from Kitten Yarn improved my original pattern and came up with a lovely flower, which her daughter turned into a hairclip. You can see it here.

And Cheri from Crochet Partners Yahoo group sent me a link to another hydrangea pattern shared by Camelia Shanahan on her blog. I loved that pattern and quickly set to work on my new hydrangea flowers.

I tried the same purple yarn, but it didn’t work so well for this pattern. My flower came out too big. So I switched to purple and lilac cotton thread and liked the result much better.


The pattern is fairly easy except for one thing – clone knots! I’ve never heard about them until I came across this pattern. I had to search the Internet to learn how to make them (I will make a post about clone knots later).

Once again, thank you all for your kind help. And big thanks to Camelia Shanahan for her pattern.

Crochet Hydrangea Flowers Free Pattern

I am linking this post to the following link parties:

Tutorials, Tips, and Tidbits at Stone Gable,
Show and Tell Friday @ My Romantic Home
Potpourri Friday @ 2805.


Saturday, September 1, 2012

Hydrangea Inspired Flowers


I love blue and purple hydrangea and was inspired to make crocheted hydrangea flowers. I used purple 100% acrylic yarn.
I am somewhat disappointed!


My flowers turned out pretty enough, yet they don’t quite look like hydrangea. The pearl beads are too big for my flowers (I didn’t glue them on, just laid them on for the picture). Next time I am at a crafts store, I should look for smaller purple or blue beads for my flower centers. The shape of the petals is not right either. The hydrangea petals are somewhat pointy, but I didn’t know how to achieve that effect in my crocheted flowers.


Here is the pattern anyway in case someone likes them. It’s extremely easy.

Ch 5, join with a slip stitch to make a ring.

*Ch 3, 2 tr in ring, ch 3, sc in ring* repeat from * three  times. Fasten off.


~~~~~~~~~~~~~~~~~~~~~~~~~~


Crochet Patterns from my Shop

Monday, August 27, 2012

Tablecloth Update: Four Motifs Done

Back in May I started a big project of crocheting a tablecloth for my dining room table. The pattern I chose requires making square motifs, which are then put together. For my table I will need eighteen such motifs.

I eagerly started this project and set Christmas as the due date. However, it’s almost September and I only managed to finish four motifs. I must admit it’s awfully boring to crochet the same motif over and over again. What is more, only trebles and chains are used in the pattern. Chain two, treble, chain two, four trebles, chain two… So monotonous!


On the other hand, when I laid my four motifs next to each other, I really liked the overall pattern. If this table cloth will ever be finished, it’s going to be a gorgeous one!

What do you do when you get bored with a project but at the same time want to finish it? How do you find motivation to continue working on it?

By the way, if anyone is interested in the pattern, here is the link:

Motif Table Cloth Free Pattern