Thursday, October 31, 2013

New Pineapple Skirt in Progress


Back in September I made myself a purple pineapple skirt, and now I finally started working on another one.

This time I’m taking detailed notes along the way, so that I can write the pattern. Even though I’m using the pineapple stitch for this skirt as well, the design of this skirt will be different.
I chose bright red color, which I belive will look great with white or black.

I’m using Bernat Handicrafter crochet acrylic thread that I bought online from Joann. I purchased a ball of 1,746 yards, which should be enough for my skirt. Joann has a great selection of colors, and I actually bought three additional balls of this thread in pink, linen, and robust red. I am quite stocked up for the future projects!


I’ve completed 12 rounds so far, but the “pineapples” are not showing yet.

This is my second attempt. I had made about a fourth of the skirt but had to unravel it all because it wasn’t coming out the way I wanted it. But it seems much better now.

I’m very excited about this project and I can’t wait to finish it. I think it will turn out even better than the purple one.


Monday, October 28, 2013

The Holidays Are Coming


The beginning of the Holiday Season is only one month away. Many crocheters have started working on Christmas crochet projects and handmade gifts.

As for me, I haven’t. Somehow I don’t have any ideas yet. But I hope insprition  will visit me when more Christmas decorations appear on the streets of my city and in the stores. 

For now I want to reshare a few Christmas projects that I made in the past two years (see links to each post under the photos). 

And what about you? Are you crocheting any Christmas decorations yet?


crocheted angel


crochet snowflakes


Thursday, October 24, 2013

Baby/Toddler Berets, Free Crochet Pattern


Until now I had only designed and crocheted baby beanies, but today I want to share something different.

It’s a baby/toddler beret pattern that I came up with. Of the three berets shown in the picture, the lavender one was the first one I made. I used a light weight 3-ply acrylic yarn and size G/6 (4.25 mm) hook. The finished beret came out about 19 inches in circumference; it should fit a girl 12 - 36 months old.

I needed to make a smaller beret, but I didn’t want to change/rewrite the pattern (it was enough work to come up with it in the first place), so instead I simply changed the hook size.

For the pink and beige berets shown in the picture, I used size E/4 (3.5mm) hook and crocheted a bit tighter (personally I prefer working with smaller than recommended hooks anyway), and the berets turned out 16.5 inches in circumference. They should fit a girl under 12 months.


So the pattern is the same, but depending on the hook size you use, you can make a baby or a toddler size beret.

Light weight 3-ply acrylic yarn


Baby Size: Crochet hook E/4 (3.5mm)


Gauge: 3 first rounds measure 3.5 inches in diameter


Toddler Size:  Crochet hook size G/6 (4.25 mm)


Gauge: 3 first rounds measure 4 inches in diameter


Ch 7, join into ring with sl st.


Round 1: ch 3, 15 dc in ring; sl st in 3rd ch of beginning ch-3.


Round 2: ch 5, *dc in next dc, ch 2* around; sl st in 3rd ch of beginning ch-5.


Round 3: ch 6, *2 dc in next dc, ch 3, dc in next dc, ch 3* seven times, 2 dc in next dc, ch 3; sl st in 3rd ch of beginning ch-6.


Round 4: ch 6, *2 dc in next dc, dc in next dc, ch 3, dc in next dc, ch 3* seven times, 2 dc in next dc, dc in next dc, ch 3; sl st in 3rd ch of beginning ch-6.


Round 5: ch 6, *2 dc in next dc, dc in next dc, 2 dc in next dc, ch 3, dc in next dc, ch 3* seven times, 2 dc in next dc, dc in next dc, 2 dc in next dc, ch 3; sl st in 3rd ch of beginning ch-6.


Round 6: ch 6, *2 dc in next dc, dc in next 3 dc, 2 dc in next dc, ch 3, dc in next dc, ch 3* seven times, 2 dc in next dc, dc in next 3 dc, 2 dc in next dc, ch 3; sl st in 3rd ch of beginning ch-6.


Round 7: ch 6, *2 dc in next dc, dc in next 5 dc, 2 dc in next dc, ch 3, dc in next dc, ch 3* seven times, 2 dc in next dc, dc in next 5 dc, 2 dc in next dc, ch 3; sl st in 3rd ch of beginning ch-6.


Round 8: ch 6, *dc in next 9 dc, ch 3, dc in next dc, ch 3* seven times, dc in next 9 dc, ch 3; sl st in 3rd ch of beginning ch-6.


Round 9: ch 6, *dc2tog over next 2 dc, dc in next 5 dc, dc2tog over next 2 dc, ch 3, dc in next dc, ch 3* seven times, dc2tog over next 2 dc, dc in next 5 dc, dc2tog over next 2 dc, ch 3; sl st in 3rd ch of beginning ch-6.


Round 10: ch 6, *dc2tog over next dc2tog and  dc, dc in next 3 dc, dc2tog over next dc and dc2tog, ch 3, dc in next dc, ch 3* seven times, dc2tog over next dc2tog and  dc, dc in next 3 dc, dc2tog over next dc and dc2tog, ch 3; sl st in 3rd ch of beginning ch-6.


Round 11: ch 6, *dc2tog over next dc2tog and  dc, dc in next dc, dc2tog over next dc and dc2tog, ch 3, dc in next dc, ch 3* seven times, dc2tog over next dc2tog and  dc, dc in next dc, dc2tog over next dc and dc2tog, ch 3; sl st in 3rd ch of beginning ch-6.


Round 12: ch 6, *dc2tog over next dc2tog and dc, dc in next dc, ch 3, dc in next dc, ch 3* seven times, dc2tog over next dc2tog and dc, dc in next dc, ch 3; sl st in 3rd ch of beginning ch-6.


Round 13: ch 2, *3 sc in next ch-3 space, sc in next dc2tog, sc in next dc, 3 sc in next ch-3 space* around; sl st to join round.


Round 14 - 15: ch 2, sc in each sc around; sl st to join round.

Fasten off.


Monday, October 21, 2013

Crochet Autumn Flowers


Finally fall has arrived! It seems that many trees around my neighborhood turned yellow, red, and brown just in a few days. The sites around are beautiful and I feel in the mood for the fall colors too.

I had a bit of free time (my mom is visiting us right now and helps with the kids), so I experimented with the yellow, red, and brown yarn in my stash and came up with these simple flowers. I might add them to my autumn wreath that hangs on our front door now.


Ch 5, sl st to join in ring.

Round 1: ch 5, *dc in ring, ch 2* 7 times, sl st in 3rd ch of beginning ch-3. Fasten off, wave in the end.

Round 2: Attach the second color in any ch-2 space and make (ch 1, dc, tr, dc, hdc) all in that same space, * (hdc, dc, tr, dc, hdc) all in next ch-2 space * around. Fasten off, wave in the end.


Thursday, October 17, 2013

Cashmere Crochet Baby Hat, Size 12 Months, Free Pattern


I have made lots of baby hats in the past year, but this one is rather special because of two reasons. First, I made it for a very special little girl, who will celebrate her first birthday this month. Second, this hat is made of fine cashmere yarn and is fabulously soft and beautiful.

I bought Jojoland 100% Cashmere Lace Weight Yarn (C-266, Lilac) from Paradise Fibers. One skein weights 50 grams and contains 440 yards of yarn. I used up about half of one skein for this baby hat.

I hope there is enough yarn left to make another slightly bigger child’s hat as the very special girl has a very special sister, whose birthday is coming up in a couple of months too.  

I gladly share my pattern below, but please do not repost it on other sites or worse yet sell it (yes, I have seen my free patterns being sold). Use this pattern to make hats for the special little girls you have in your life!


This pattern is my original design. It cannot be posted on other sites or distributed in any other form. If you would like to share this pattern, you can post ONE image on your site with the link to my original post. You can use this pattern to make items for personal use or for sale. If you sell finished items from this pattern, you must give design credit to Lacy Crochet blog (lacycrochet.blogspot.com). Please, respect my work. Thank you!


The finished hat measures about 16 inches in circumference and 6.5 inches in height. It should fit a girl 12 - 18 months old.  


Skill Level: Intermediate

Materials: Jojoland Cashmere Lace Weight yarn, C-266 Lilac (50 gram, 440 yards)


Boye steel crochet hook size 4 (2.00 mm)

Tapestry needle


Three pearl beads (optional)


Gauge: first 4 rounds measure 2.75 inches in diameter


Ch 5, sl st to join in ring.


Round 1: ch 5, *dc in ring, ch 2* 7 times, sl st in 3rd ch of beginning ch-3.


Round 2: sl st in next ch-2 space, (ch 1, dc, tr, dc, hdc) all in same ch-2 space, * (hdc, dc, tr, dc, hdc) all in next ch-2 space * around.


Round 3: sl st to next tr; ch 5, (dc, ch 2, dc) all in same tr,  * (dc, ch 2, dc, ch 2, dc) all in next tr * around; sl st in 3rd ch of beginning ch-5.


Round 4: sl st in next ch-2 space, (ch 1, dc, tr, dc, hdc) all in same ch-2 space, * (hdc, dc, tr, dc, hdc) all in next ch-2 space* around.


Round 5: sl st to next tr, ch 5, dc in same tr, * (dc, ch 2, dc) all in next tr * around; sl st in 3rd ch of beginning ch-5.


Round 6: sl st in next ch-2 space, (ch 1, dc, tr, dc, hdc) all in same ch-2 space, * (hdc, dc, tr, dc, hdc) all in next ch-2 space* around.


Rounds 7-10: repeat Rounds 3-6.


Rounds 11- 25: repeat Rounds 5-6 (ending with round 5).


Round 26: ch 1, 3 sc in each ch-2 space around; join round with sl st.


Rounds 27: sc in each sc around; join round with sl st.


Rounds 28-29: repeat Round 27.


Fasten off.


Use two strands of yarn to make the flower.


Ch 53.


Row 1: dc in 3rd ch from hook and in each ch across. Turn.


Row 2: *sc in next dc, 5 dc in next dc* across; sc in last dc.


Finish off but leave a yarn tail long enough to sew the flower together and attach it to the hat. Wave in the short yarn tail on the other end of the work.


Use a tapestry needle to finish the flower. Little by little, roll the crochet piece and stitch together. For more help making this flower, see my photo tutorial.


Sew the flower on the hat.


More baby patterns from my shop:


Sunday, October 13, 2013

Crochet Trim for Kitchen Towels


This week I’m working on decorating my home for the autumn holidays. I already took out the indoor decorations and put them on display in our dining and family rooms. I still need to decorate the front door area and carve jack-o-lanterns. I know my boys will be glued to the window when the jack-o-lanterns are glowing in the dark in our front yard. That’s so much fun to them!

And what is fun for me this time of year is cooking and baking in my cozy kitchen, which needs a bit of decorating and cheering up too.  


I bought a set of two cute, autumn themed kitchen towels, which should bright up my kitchen. But for extra charm I’m adding crochet lace trims. It is an easy and fun project to do. 

I already finished one towel and I’m working on the second one.


Steel hook size 10, size 10 crochet cotton thread.

Shell: (2 dc, ch 2, 2 dc) all in one space.

Row 1: sc across working directly into fabric.

Row 2: ch 1, sc in next sc, *ch 1, skip 2 sc, shell in next sc, ch 1, skip 2 sc, sc in next sc* across. Turn.

Row 3: ch 3, dc in same beginning space, ch 1, *shell in next shell, ch 2* across; shell in last shell, ch 1, 2 dc in last sc. Turn.

Row 4: ch 3, dc in same beginning space, ch 1, *shell in next shell, ch 1, sc in next ch-2 space, ch 1* across; shell in last shell, ch 1, 2 dc in last dc. Turn.

Row 5: ch 3, dc in same beginning space, ch 1, *shell in next shell, ch 2* across; shell in last shell, ch 1, 2 dc in last dc. Turn.

Row 6 same as Row 4.

Row 7: ch 3, dc in same beginning space, *ch 1, (2 dc, ch 1, picot, ch 2, 2 dc) all in next shell* across; ch 1, 2 dc in last dc. Fasten off.


Thursday, October 10, 2013

Royal Pineapple Table Topper


Do I really need another doily? I already have a whole bunch of them. I already gifted away another bunch. And I even tried selling them, but no one wants to buy.  And yet I just can’t stop this obsession of making new ones.


I’ll tell you my secret. Sometimes I crochet a doily just for the sake of crocheting, taking photos and sharing them on my blog. Then I unravel it and use the thread to make another one.


As I was crocheting this big pineapple doily, its fate was supposed to be the same. Even as the doily was finished, I still was determined to unravel it. Until...

until I took these pictures! My goodness, it’s so romantic, so delicate, and so dreamy.

I can’t bring myself to unraveling this beauty. So it too will go into my drawer of doilies. And it probably will be a long time before it sees the daylight again.


Now to the technicalities.

I used a steel crochet hook size 4 and crochet cotton thread size 10. The doily came out about 29 inches across from tip to tip.

This was a vintage pattern from Complete Book of Crochet, The Spool Cotton Company, 1946. This is Pineapple Doily number 7275-M.

I believe this pattern is in the public domain now, so I post it below (please, let me know if I’m wrong, and I will remove the pattern right away).

Starting at center, Ch 16, join with SLst. 

First Rnd: Ch 3, 32 Dc in ring, SLst in 3rd st of Ch-3.

2nd Rnd: Ch 3, Dc in each Dc around; join to 3rd st of Ch-3.

3rd Rnd; Ch 3, Dc in same place as SLst, 2 Dc in each Dc around, SLst in 3rd st of Ch-3.

4th Rnd: Rep. 2nd Rnd.

5th Rnd: Ch 3, Dc in same place as SLst,
* Ch 3, skip 2 Dc, 2 Dc in next Dc.
rep. from * around, end with- Ch 3, join to 3rd st of Ch-3 (22 Dc-groups).

6th Rnd: SLst in next Dc and in next sp, Ch 3; in same sp make Dc, Ch 2 and 2 Dc; in each Ch-3 sp around make 2 Dc, Ch 2 and 2 Dc; join.

7th Rnd: SLst in next Dc and in next Ch-2 sp, Ch 3, in same sp make Dc, Ch 2 and 2 Dc;
* Ch 1, in next Ch-2 sp make 2 Dc, Ch 2 and 2 Dc (shell over shell).
rep. from * around, end with- Ch-1; join.

8th to 12th Rnds incl: Rep. 7th Rnd, having an extra Ch between each shell in each Rnd.

13th Rnd: SLst in next Dc and in next sp, Ch 3; in same sp make Dc, Ch 5 and 2 Dc.
* Ch 6, in next Ch-2 sp make 2 Dc, Ch 2 and 2 Dc, Ch 6; in next Ch-2 sp make 2 Dc, Ch 5 and 2 Dc.
rep. from * around; join.

14th Rnd: SLst in next Dc and in next sp, Ch 4, 12 Tr in Ch-5 of shell,
* Ch 5, in next Ch-2 make 2 Dc, Ch 2 and 2 Dc; Ch 5, 13 Tr in Ch-5 of next shell.
rep. from * around, end with- Ch 5, join.

15th Rnd: Ch 5 (to count as Tr and Ch-1), Tr in next tr; (Ch 1, Tr in next Tr) 11 times;
* Ch 3, shell over next shell, Ch 3, Tr in next tr; (Ch 1, Tr in next Tr) 12 times.
rep. from * around; join to 4th st of Ch-5 first made.

16th Rnd: SLst in first Ch-1 sp, Sc in same sp;
* (Ch 3, Sc in next Ch-1 sp) 11 times,
Ch 3, shell over next shell, Ch 3, Sc in next Ch-1 sp.
rep. from * around, end with- Ch 3, Sc in first Ch-3 lp.

17th Rnd: (Ch 3, Sc in next lp) 10 times,
* Ch 3, shell over next shell; (Ch 3, Sc in next lp) 11 times.
rep. from * around, end as in l6th Rnd.

18th Rnd: (Ch 3, Sc in next lp) 9 times,
* Ch 3, in Ch-2 of next shell make 2 Dc, Ch 2, 2 Dc, Ch 2 and 2 Dc. (Ch 3, Sc in next lp) 10 times.
rep. from * around, end as before.

19th Rnd: (Ch 3, Sc in next lp) 8 times,
* Ch 3, in next Ch-2 make (1) shell, Ch 2, shell in next Ch-2. (Ch 3, Sc in next lp) 9 times.
rep. from * around, end as before.

20th Rnd: (Ch 3, Sc in next lp) 7 times,
* Ch 3, shell over next shell, Ch 1, shell in next Ch-2 sp, Ch 1, shell over next shell; (Ch 3, Sc in next lp) 8 times.
rep. from * around, end as before.

21st Rnd: (Ch 3, Sc in next lp) 6 times;
* (Ch 3, shell over next shell) 3 times;
(Ch 3, Sc in next lp) 7 times.
rep. from * around, end as before.

22nd Rnd: (Ch 3, Sc in next lp) 5 times,
* Ch 3, shell over next shell; (Ch 4, shell over next shell) twice;
(Ch 3, Sc in next lp) 6 times.
rep. from * around.

23rd Rnd: (Ch 3, Sc in next lp) 4 times;
* Ch 3, shell over next shell, Ch 5; in next shell make 2 Dc, Ch 5 and 2 Dc; Ch 5, shell over next shell; (Ch 3, Sc in next lp) 5 times.
rep. from * around.

24th Rnd: (Ch 3, Sc in next lp) 3 times;
* Ch 3, shell over next shell, Ch 3, 14 Tr in next shell, Ch 3, shell over next shell; (Ch 3, Sc in next lp) 4 times.
rep. from * around.

25th Rnd: (Ch 3, Sc in next lp) twice;
* Ch 3, shell over next shell, Ch 3, Tr in next tr; (Ch 1, Tr in next Tr) 13 times;
Ch 3, shell over next shell; (Ch 3, Sc in next lp) 3 times.
rep. from * around.

26th Rnd: Ch 3, Sc in next lp,
* Ch 3, shell over next shell; (Ch 3, Sc in next Ch-1 sp) 13 times;
Ch 3, shell over next shell; (Ch 3, Sc in next lp) twice.
rep. from * around.

27th Rnd:
* Ch 4, shell over next shell; (Ch 3, Sc in next lp) 12 times;
Ch 3, shell over next shell; Ch 4, Sc in next lp.
rep. from * around, end with- Ch 4, SLst in first Sc. Break yarn.

28th Rnd: SLst to sp of shell, Ch 3, in same sp make Dc, Ch 2 and 2 Dc;
* (Ch 3, Sc in next lp) 11 times;
(Ch 3, shell over next shell) twice.
rep. from * around. Join.

29th Rnd: SLst to sp of shell, Ch 3, in same sp make Dc, Ch 2 and 2 Dc;
*(Ch 3, Sc in next lp) 10 times;
Ch 3, shell over next shell, Ch 1, shell in next Ch-3 sp, Ch 1, shell over next shell.
rep. from * around. Join.

30th Rnd: Make (1) shell as before,
* (Ch 3, Sc in next lp) 9 times;
(Ch 3, shell over next shell) 3 times.
rep. from * around. Join.

31st Rnd: Shell over shell,
* (Ch 3, Sc in next lp) 8 times;
Ch 3, shell over shell, (Ch 4, shell over next shell) twice.
rep. from * around. Join.

32nd Rnd: Shell over shell,
* (Ch 3, Sc in next lp) 7 times;
Ch 3, shell over shell, Ch 5, in next shell make 2 Dc, Ch 6 and 2 Dc; Ch 5, shell over shell.
rep. from * around. Join.

33rd Rnd: Shell over shell,
* (Ch 3, Sc in next lp) 6 times;
Ch 3, shell over shell, Ch 3, 16 Tr in Ch-6 lp, Ch 3, shell over shell.
rep. from * around (3rd Rnd of pineapples started). Cont. to work around until only 1 lp remains at top of 2nd Rnd of pineapples.
Next Rnd: Shell over shell,
* Ch 4, Sc in next lp, Ch 4, shell over shell, Ch 4, Sc in next lp, (Ch 3, Sc in next lp) 11 times;
Ch 4, shell over shell.
rep. from * around. Join.

To Make Points: first Rnd: Ch 3, turn.
Work shell over last shell, Ch 4, Sc in next lp, (Ch 3, Sc in next lp) 10 times;
Ch 4, shell over shell. Ch 3, turn.
2nd Rnd: Shell over shell, Ch 4, Sc in next lp, (Ch 3, Sc in next lp) 9 times;
Ch 4, shell over shell. Ch 3, turn.

Cont. in this way, having (1) Ch-3 lp less on each Rnd until 1 lp remains at top of pineapple. Ch 3, turn.
Next Rnd: Make shell over shell, Ch 4, Sc in lp, Ch 4, 2 Dc in next shell,
Ch 1, SLst back in Ch-2 of last shell, Ch 1, 2 Dc where last 2 Dc were made.
Tie off.

Attach yarn to first shell of next pineapple and complete the point in same way.
Cont. thus until all 11 points have been worked.


I'm linking this post to 
Tutorials, Tips and Tidbits @ Stone Gable
Link Your Stuff @ Annamarie's Haakblog
Home Sweet Home Friday @The Charm of Home,
Show and Tell Friday @ My Romantic Home,

Monday, October 7, 2013

Easy Blocks Baby Blanket, my free pattern


This baby afghan is super easy to make.  There are only two repeating rows and the stitches involved are single crochets, double crochets, slip stitches and chains.

But despite the simplicity of the crochet techniques used, this blanket looks pretty enough to be given away as a baby gift or made for your own little darling. 

This stitch is a multiple of 5, plus 2. It can be easily adjusted for bigger size.


This pattern is my original design. It cannot be posted on other sites or distributed in any other form. If you would like to share this pattern, you can post ONE image on your site with the link to my original post. You can use this pattern to make items for personal use or for sale. If you sell finished items from this pattern, you must give design credit to Lacy Crochet blog (lacycrochet.blogspot.com). Please, respect my work. Thank you!


Finished Size: 40 by 31 inches


Materials:


A Pound of Love by Lion Brand, 1 ball


Crochet hook US size H/8 (5 mm)


Ch 122 loosely.


Row 1: sc in 2nd ch from hook, *ch 5, skip 4 ch, sc in next ch* across. Ch 3, turn.


Row 2: 5 dc in next ch-space, *ch 1, 5 dc in next ch-space* across; dc in last sc. Ch 1, turn.


Row 3: sc in same beginning space, ch 5, *sc in next ch-1 space, ch 5* across; sc in last dc. Ch 3, turn.


Repeat Row 2 – Row 3 until your blanket measures 40  inches in length. End with Row 3. Turn.


Trim:


Working in last row: *sl st into next ch-5 space, ch 3, 3 dc in same ch-5 space* across.


Working in end of rows: *sl st into next dc-space, ch 3, 2 dc in same space* across.


Working in original chain: *sl st into next ch-space, ch 3, 3 dc in same ch-space* across.


Working in end of rows: *sl st into next dc-space, ch 3, 2 dc in same space* across. Sl st into corner to join the round. Fasten off. 


More baby blanket patterns from my shop: 


Thursday, October 3, 2013

October Centerpiece


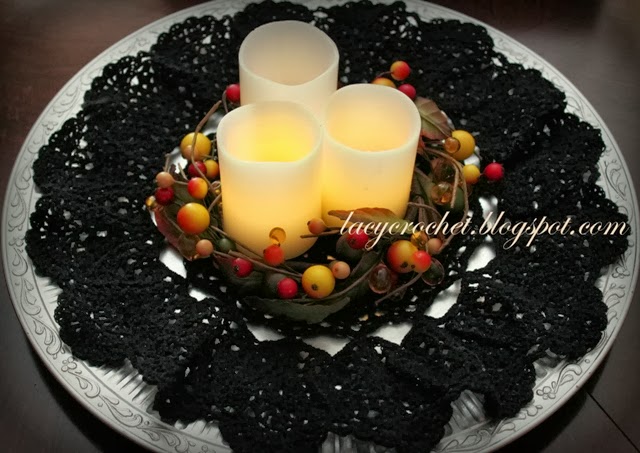
The weather is still summerlike during the day, but the nights and evenings are chilly. The days are shorter, and during the dinnertime time it’s already dark outside. It’s nice to light up candles and turn on some relaxing classical music during dinner. 

I used my black Mantilla doily that I crocheted last year to create a simple dinner table centerpiece. With Halloween coming in less than a month, the black color is quite suitable. The candles are flameless (good idea when kids are around). But they are made of real bee wax and look almost real; they also have a subtle vanilla scent.

This is the only black doily I have. Black thread is not easy to work with, and I don’t think I’ll be making another one.

The free pattern for this doily was from Coats and Clark website. You can see it here.

I'm linking this post to 
Tutorials, Tips and Tidbits @ Stone Gable
Create It Thursday @ Lamberts Lately
Link Your Stuff @ Annamarie's Haakblog
Thrifty Things Friday @ The Thrifty Groove
Home Sweet Home Friday @The Charm of Home,
Show and Tell Friday @ My Romantic Home,