In this
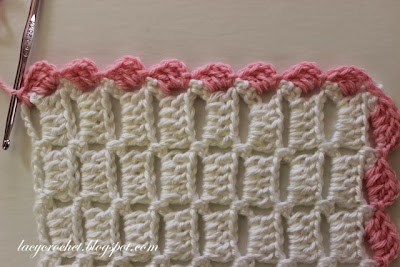
tutorial I will show you how to make the scalloped trim that I used for my Easy Blocks Baby Blanket shown bellow. One of the readers asked for help, but
perhaps this tutorial will be useful to other readers as well as it can be used
for many different crochet projects (you can easily adjust the amount of dc in each scallop to fit your project).
So here I made
a small sample version of my Easy Blocks Baby Blanket. Now I will use a
contrasting color yarn to demonstrate how the trim is made.
The pattern
reads: Working in last row: *sl st into next ch-5 space, ch 3, 3 dc in same
ch-5 space* across.
So let’s
begin.
Sl st into
next ch-5 space.
Ch 3, 3 dc
in same ch-5 space.
Sl st into
next ch-5 space.
And again,
ch 3, 3 dc in same ch-5 space. From this point we just repeat in the same
manner.
When we get
to the corner, we continue working into the end of the rows. The pattern reads:
Working in
end of rows: *sl st into next dc-space, ch 3, 2 dc in same space* across.
Because our “blocks”
have a rectangular shape (not a perfect square), we are using only 2 dc for
each scallop on this side.
Ch 3, 2 dc
in same space.
Sl st into
next dc-space.
And again,
ch 3, 2 dc in same dc-space. We continue in same manner across.
Next, working
in original chain: *sl st into next ch-space, ch 3, 3 dc in same ch-space*
across.
And finally,
working in end of rows: *sl st into next dc-space, ch 3, 2 dc in same space*
across.
Sl st into corner to join the round. Fasten off.

In the
picture above you can see that I didn’t cut the white and pink yarn tails. That’s
because I’m going to unravel this piece. I solely made it for the demonstration
purpose for this trim.
However, I think if it was made in cotton yarn instead
of acrylic, it would’ve made a cute washcloth or a dishcloth.


Beautiful work!
ReplyDeleteAjka
i love this stitch.... beautiful
ReplyDeletemarvellous and clear tutorial, thanks. I think it would make a lovely dish/wash cloth too. Or make it big and it's a blanket :-)
ReplyDeleteprecioso punto, en toquilla para bebe queda precioso; yo hice una hace tiempo y quedo ideal!!! un besito.maria:)
ReplyDeleteLooks very nice! I will have to try this for the next baby that comes along!
ReplyDeleteOlga, Your skills are amazing. I love how the items you create are breathtaking beautiful. I wish I had some of your talent!
ReplyDelete