

A couple of weeks ago I made a lacy bonnet (shown bellow), and now I made a matching baby jacket.
The pattern was from Woollies for Babies, Book No. 197, Chadwick's Red Heart Wools, by The Spool Cotton Company, 1943.

I used the same yarn as for the bonnet, which was a leftover category 1 yarn from my stash. I'm not sure what size hook I used. I just went alone with a steel hook that felt comfortable for this yarn. It's a vintage hook, and all it says on it is "Boye 1", and on the other side "U.S.A. 10 cents".
The pattern is not difficult, however it's not a very detailed one. So I wouldn't recommend it to novices. Otherwise, this baby sacque was fun to make. And it looks adorable on my 20-inch doll.
The original pattern suggests to make three button loop and sew on three buttons, but I only went with two.
GAUGE: (Yoke) 5 sc make 1 inch; 5 rows make 1 inch.
YOKE … Ch 56 tightly to measure 9 inches. 1st row: Sc in 2nd ch from hook and in next 7 ch, * sc in same ch, sc in next 8 ch. Repeat from * to end (61 sc). Ch 1, turn. 2nd row: Sc in each sc, increasing 6 sc evenly around. Ch 1, turn. Repeat the 2nd row (but do not make increases directly above previous increases) until Yoke measures 2 inches and there are 115 sts. Ch 3, turn. Next row: Dc at base of ch-3, ch 1, 2 dc in same place, * ch 1, skip 2 sc, in next sc work 2 dc with ch-1 between (small shell made), ch 1, skip 2 sc, in next sc work 2 dc, ch 2 and 2 dc (large shell made). Repeat from * across (20 large shells in row). Turn. Following row: Sl st in next st and in next sp. Ch 3, in same sp work dc, ch 1 and 2 dc, then * ch 1, work small shell in sp of next small shell, ch 1, work large shell in sp of next large shell. Repeat from * across. Repeat the last row 3 more times (5 rows of shells). Fasten off.


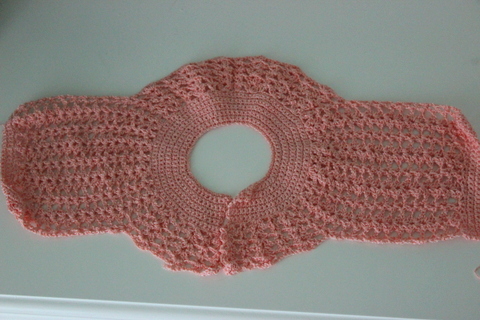
BODY … Attach yarn to sp of 1st large shell and work in pattern until there are 3 large shells. Ch 1, work small shell in same place where 1st small shell of sleeve was worked, ch 1, small shell in same place where last small shell of sleeve was worked (thus joining) and continue in pattern across, joining 2nd underarm in same way. Turn. Next row: Work in pattern until there are 3 small shells, ch 1, work large shell in ch-1 at underarm, ch 1 and continue in pattern across, making another large shell at other underarm. Turn. Work in pattern until work measures 7 inches from bottom of Yoke. Next row: Sl st in next st and in next sp. Ch 3, dc in same sp, ch 3, sc in 3rd ch from hook (picot made); 2 dc in same sp, * ch 1, dc in sp of small shell, picot, dc in same sp, ch 1, 2 dc in sp of large shell, picot, 2 dc in same sp. Repeat from * across. Fasten off. Work a row of sc along front edge of right side of yoke, making three ch-2 button loops. Sew sleeve seams.

Link Your Stuff @ Annamarie's Haakblog
Crafting Along @ Be a Crafter


.jpeg)


Wunderschön! :-)
ReplyDeleteLiebe Grüße, Manja
So adorable !!!!
ReplyDeleteThanks for sharing the pattern !
Have a lovely day !
Anna
I love your little peach sweater AND bonnet to match! So sweet.
ReplyDeleteSo pretty and looks like it's pretty easy to make. I've never made anything like this before, but looking at your pictures and instructions, I think I could make one. Your doll looks pretty wearing it! TFS
ReplyDeleteJust lovely!
ReplyDeleteque bonito, con la cantidad de muñecas que tiene mi sobrina, me viene genial este tutorial !!! un besito.maria:)
ReplyDeleteIs this a newborn size or closer to 3 months
ReplyDeleteDepends on what yarn you are going to use. Mine came out closer to newborn size.
Deletelove love thanks so much
ReplyDeleteFor row 2 how many ch before u place each increase?
ReplyDeleteFor row 2 how many ch before u place each increase?
ReplyDeleteRow 2 how many ch before u place an increase. Please
ReplyDeleteNo entiendo como hacer la unión del cuerpo con la manga. Está muy confuso para mi. Luego de hacer 3 conchas grandes, cómo paso a la manga. No se, no me sale. Ayuda, por favor.
ReplyDeleteThe way I understand it, you start from the beginning of the row where your buttons will go. Make your pattern as normal until you've made the three large shells just like you did before making the sleeve. When you get to where that small shell is (where you started your sleeve) you join that small shell to the small shell where you ended your sleeve. I hope I explained that well. The pattern directions seem to be written for someone who can generally figure out
Deletewhat hasn't been written. It confused me a bit as well.
what size hook for a newborn
ReplyDelete