Tuesday, April 30, 2013

Crochet Flower Cushion


Tah-dah, my flower cushion is finally finished!


It turned out completely different than the way I envisioned it when I first started this project. Lots of changes took place. For example, I rejected the swirl flowers I was going to use. Also I intended to make green flowers but ended up making leaves instead. In addition, I popped in a bit of yellow to add liveliness to the cold green and blue palette.

I’m happy with my new cushion, and I like the way it fits in my bedroom décor.


I didn’t write a detailed pattern, but here is a rough description how I made it.

For the cover itself, I used single crochets in back loops only. I started with a ring of 5 chains.

The first round was: ch 2, sc in ring, *ch 2, 2 sc* 3 times,  ch 2, join with a sl st. And in the following rounds, I just crocheted sc in back loops only, and (sc, ch 2, sc) in corner spaces. I continued until I had a square of needed size.

I made two such squares and stitched them together (right side outside) on three sides using single crochets. Then I put in my pillow, and left the fourth side unstitched until all the flowers were attached (I stitched them on using a tapestry needle). Then I stitched the last side using single crochets, and made another round of single crochets in back loops only to make the trim a bit thicker.


Now to the flowers:


1. This is simple five petal flower. I made a small white circle for the center and stitched it on.

2. I will post the pattern for this peony-like flower later. As for the leaves, I can only offer you a symbol chart (see motif 4 here).

3. This is a big layered flower (the pattern is here) and the leaves are simple Irish crochet leaf (see my pattern here).


5. This is a bigger version of croco flower. I made one exactly as in the pattern, and I also made a bigger one.

6. The pattern for the small four petal flower is here.


I’d say this flower cushion was more work than I expected. I guess it’s always like that when you are not following a specific pattern but trying to come up with your own creation. It takes lots of time to get every single detail right.

P.S. Thank you for the get well wishes. I'm almost recovered now. 


I'm linking this post to Tweak It Tuesday @ Cozy Little House,
Clever Chicks Blog Hop at The Chicken Chick,
Teach Me Tuesday Link-Up @ Growing Home,
Link Your Stuff @ Annamarie's Haakblog
Tutorials, Tips and Tidbits @ Stone Gable
Thrifty Things Friday @ The Thrifty Groove
I ♥ Fridays Link Party @ Petals to Picots


Friday, April 26, 2013

Easy Pineapple Doily


I came across the pattern for this lovely pineapple doily and couldn’t resist making it (update: unfortunately, the pattern is not longer available). Besides, I was getting bored with my flower cushion project and I thought I need to crochet something different for a change.


The pattern is very easy, and the doily is quick to make. It took me one evening to make it. In the original pattern, the doily is made in yellow, but I made mine in white.


The roses in the pictures are from my yard. How nice to clip off a few and make a bouquet. Fresh flowers always cheer me up! And that is exactly what I need right now because I have caught a bit of cold. I hope to recover over the next couple of days.


Have a wonderful weekend and don’t get sick!


Tuesday, April 23, 2013

What a Pity!


I was cleaning my closet and came across this handmade summer top. I made it back in 2010 and only got to wear it a few times that summer (it looked lovely worn on a white cami with a white skirt and I also wore it with jeans). What a pity that I’ll never be able to wear it again! 

When I made it, it was already quite fitted. Then in a year, I had my second son, so I had grown one size up.


I don’t dare to unravel this top as I love every stitch of it (especially the lacy part). And I don’t want to donate it either (I guess I just can’t let it go). My cousin has a ten-year-old girl, and perhaps in a few years I can give it to her if she likes it. But for now my lovely lilac top just sits in the closet.
   
The pattern was from a Russian or Ukrainian crochet magazine that my mom bought me. The upper part is knitted and the bottom is crocheted.

Do you have any handmade items that you have no use of, but wouldn’t part with them?
 

Sunday, April 21, 2013

Simple Leaf Crochet Pattern


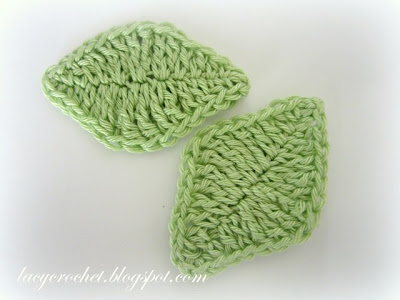
The photo above is a sneak peek at my flower cushion project (which is coming along quite well and I hope to finish it this week). I’m posting this picture because I want to share the pattern for those cute simple leaves. 

By the way, if you are wondering about the pattern of the blue flower, you can see it here.


Ch 14 loosely.

Sc in 3rd ch from hook, hdc in next ch, 2 dc in next 2 ch, 2 tr in next ch, 2dtr in next ch, 2 tr in next ch, 2 dc in next 2 ch, hdc in next ch, sc in next ch, 2 sc in last ch.

Continue along the other side of the starting chain:

Sc in next sc,  hdc in next ch, 2 dc in next 2 ch, 2 tr in next ch, 2dtr in next ch, 2 tr in next ch, 2 dc in next 2 ch, hdc in next ch, sc in next ch, sl st to join.

Fasten off.


You may also like these patterns from my shop:


Thursday, April 18, 2013

Layered Crochet Flower


I was searching the Interned for the patterns of big crochet flowers for my flower cushion project and came across this wonderful tutorial. I absolutely love this flower. It’s exactly what I had in mind.


I made two of these flowers using white and blue yarn. In the first one, I started with the white yarn, and then used the blue one.

In the second flower, I switched the colors. The flowers are quite big and the layers of petals really stand out. The will be perfect for my cushion.


I'm linking to
Home Sweet Home Friday @The Charm of Home,
Show and Tell Friday @ My Romantic Home,
 
Link Your Stuff @ Annamarie's Haakblog


Tuesday, April 16, 2013

Dining Table Centerpiece


The other day a neighbor of mine gave me this white rose. I put it in a small vase, took out one of my doilies, and made a simple centerpiece for my dining table. It looks lovely!

It’s incredible how sometimes even a single flower can cheer up a room. My roses are beginning to bloom too, so I’m looking forward to more doily and roses centerpieces.

By the way, the pattern (symbol char only) for this doily is here.  


Sunday, April 14, 2013

Project in Progress: Flower Cushion


I have had the idea of making a decorative cushion with crochet flowers for quite a while. Finally, I set my hands to implement the idea into life.   


I want to make a cushion for my bedroom, which is decorated in three colors – white, pale green, and light blue. The flowers on my cushion should be in those colors but in different sizes and shapes.


I’m not following any specific pattern; therefore, this project requires some experimenting. At first, I used two big granny square to make the cushion cover. However, I soon discovered that wasn’t a good choice as my finished cover stretched and simply didn’t hold its shape. I tried single crochets into back loops only and it seems to work well.

The yarn I’m using for the cushion cover is recycled. It came from an old sweater of mine that I knitted seven or eight years ago. But I’m using new yarn to make the flowers as I want them to be perfect.

I can’t wait to finish this decorative cushion! I believe it will add some romantic charm to my bedroom decor.


Thursday, April 11, 2013

Simple and Pretty Crochet Stitch


I was going to use this stitch (though not this yarn) to make my next baby blanket. 


But I decided to take a break from crocheting blankets. Right now I’m really caught up in a new project (which I’m going to tell you all about in my next post). Besides, there is still an unfinished table cloth waiting, and I have a cross-stitch project that has been on hold for quite a while too.


So this stitch will have to wait for me, but perhaps you would like to try it. 


Multiple of 6 plus 3.

Row 1: (4 dc, ch 3, 1 dc) all in 5th ch from hook, *sk 5 ch, (4 dc, ch 3, 1 dc) all in next ch* across, dc in last ch. Ch 3, turn.

Row 2: (4 dc, ch 3, 1 dc) all in next ch-3 space across, dc in 3rd ch of turning ch-3. Ch 3, turn.

Repeat Row 2.  


Tuesday, April 9, 2013

Hearts and Flowers Table Runner


I made this table runner for my mom-in-law’s birthday. Unfortunately, I underestimated the amount of time and work required to make it and started working on it only about a month prior to her special day. What is more, she lives in Norway, and it takes at least a week for a package to travel from America to Europe. So the present was late, but you know how the saying goes: “Better late…”


The pattern (in a symbol chart format only) was from a UK website Coats Crafts. (Unfortunately the link to the pattern no longer works).


The colors in the original pattern were pink, brown, red, and beige. But I substituted brown and red with lilac and white to create a spring palette. 


And here is a picture that my mother-in-law sent me. I think the runner looks lovely on her dining table.


I'm linking this post to 
Homemaking Linkup @ Hope In Every Season


Monday, April 8, 2013

Lacy Baby Blanket Tutorial, Step 9 (the Final One)

In the previous step, we have made a round of crab stitches. In this step, we will make the final round of the trim.


Last time we left off making a sl st into space between two dc.


What we are going to do next is to make a chain grabbing each dc.

Look at the picture below.


You need to make each ch quite loose, much looser than a regular beginning chain. You might need to try several times. If you see that the side of your blanket is too tight, unravel the chain and try again with even looser/bigger ch.

Here is what the chain will look on the other side.


And here it is done in the original color.


I highly recommend making this chain as the final round because along with the crab stitch, it will prevent the blanket from stretching and losing its rectangular shape. What is more, it looks very pretty.

Make this kind of chain around your entire blanket. Join in the first ch with a sl st. 

Fasten off!


Tah Dah! We are done! 

Phew! That was a lot of work, but the result is quite beautiful!  


If you have followed this tutorial through, I would love to hear your feedback. Was it useful? Did it make sense? Were you actually able to make this blanket? How did it turn out?  


Lacy Baby Blanket Tutorial, Step 5
Lacy Baby Blanket Tutorial, Step 6 
Lacy Baby Blanket Tutorial, Step 7
Lacy Baby Blanket Tutorial, Step 8

Wednesday, April 3, 2013

Lacy Chessboard Baby Blanket


Another baby blanket is complete! This is the third one I’ve designed this year. I must say I really enjoy creating lacy blanket designs. It also becomes easier to write the patterns. However, the difficult part is coming up with unique names for my baby blankets.


I gladly share the pattern. I did my best writing this patter, but mistakes and/or typos are possible. If something doesn’t make sense, please let me know.

You are welcome to use this pattern to make final items for personal use or sale, but please give a pattern credit to me (my blog) if applicable. Thank you!


This pattern is my original design. It cannot be posted on other sites or distributed in any other form. If you would like to share this pattern, you can post ONE image on your site with the link to my original post. You can use this pattern to make items for personal use or for sale. If you sell finished items from this pattern, you must give design credit to Lacy Crochet blog (lacycrochet.blogspot.com). Please, respect my work. Thank you!

Snuly Wuggly Big by Loops & Threads (1 ball)
US Crochet Hook Size E/4 (3.50 MM)


Ch 146 loosely. (Multiple of 8, plus 2)

Row 1: sc in 2nd ch from hook, sc in next ch, *ch 5, skip next 5 ch, sc in next ch, ch 3, skip next ch, sc in next ch* 17 times, ch 5, skip next 5 ch, sc in next 2 ch. 

Row 2: ch 3, turn (counts as 1st dc), dc in next (second) sc, *5 dc in next ch-5 space, ch 2, sc in next ch-3 space, ch 2* across, 5 dc in last ch-5 space, dc in last 2 sc. 

Row 3: ch 2, turn (doesn't count as a stitch), sc in 1st and 2nd dc, *sc in next dc (this is the 1st dc of dc-5 group), ch 3, skip next 3 dc, sc in next dc (this is the 5th dc of dc-5 group), ch 5* across, sc in next dc (1st dc of last dc-5 group), ch 3, skip next 3 dc, sc in next dc (5th dc of last dc-5 group), sc in last 2 dc. 

Row 4: ch 3, turn (counts as 1st dc), dc in next sc, *ch 2, sc in next ch-3 space, ch 2, 5 dc in next ch-5 space* across, ch 2, sc in last ch-3 space, ch 2, skip next sc, dc in last 2 sc. 

Row 5: ch 2, turn (doesn't count as a stitch), sc in 1st and 2nd dc, *ch 5, sc in next dc (this is the 1st dc of next dc-5 group), ch 3, skip next 3 dc, sc in next dc (this is the 5th dc of dc-5 group)* across, ch 5, sc in last 2 dc. 

Repeat Rows 2-5 until you have 113 rows in total. In the last row make ch 1, turn instead of ch 3, turn.


Edging

Round 1:
Working in the last row: hdc in next sc, *3 hdc in next ch-5 space, 3 hdc in next ch-3 space* across. Make 3 hdc in corner space.

Working in end of rows: hdc in each end of row across. Make 3 hdc in corner space.

Working in original chain: 4 hdc in next ch-5 space, *2 hdc in next ch-1 space, 4 hdc in next ch-5 space* across. Make 3 hdc in corner space.

Working in end of rows: hdc in each end of row across. Make 3 hdc in corner space. Join with a sl st.

Round 2: Ch 2, hdc in each hdc around making 3 hdc in each corner space. Join with a sl st.

Round 3 as Round 2. Fasten off, wave in the end.


More baby blanket patterns from my shop:


Tuesday, April 2, 2013

Doily Mix Table Runner


Recently I’ve seen several doily table runners on the Internet, and I was wondering if I could make one out of the doilies I have.

I pulled out all the white doilies I have and placed them on my dining table. Somehow I thought I had more white doilies, but it turned out I don’t even have a dozen.  

Anyway, I tried to arrange my white doilies in a runner shape. It looked not bad, but I think I will need more mini-doilies to fill in the spaces.

I took a picture and put the doilies back in my drawer. Perhaps some other time I’ll come back to the idea of a doily table runner.


P.S. I hope you like my new blog design. 


Monday, April 1, 2013

Lacy Baby Blanket Tutorial, Step 8

In this step, we continue working on the trim. The next round is quite simple.


Ch 4, *dc in next ch-1 space, ch 1* across.


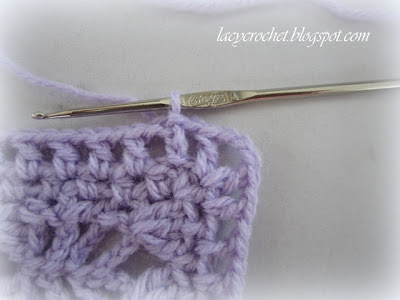
The only challenge here is making neat corners. When you get to the first corner, make

dc in ch-1 space between 1st and 2nd hdc, ch 1, (dc, ch 3, dc) all in next ch-1 space, ch 1. 

I tried to show it in the picture below. I numbered three dcs that are made in the corner space of the previous row. Notice how the second and third dcs (separated with ch 3) are made in the same space.


After you have made the corner, continue crocheting

*dc in next ch-1 space, ch 1* across.

When you get to the next corner, make it in the following way:

(dc, ch 3, dc) all in next ch-1 space, ch 1, dc in next ch-1 space, ch 1.  

Again, look at the picture below. Notice that in this corner, it is the first and second dcs (separated by ch 3) that are made in the same space.   


Again, continue making

*dc in next ch-1 space, ch 1* across.

The third corner is made identically as the first one.

And when you get to the last corner, you only need to make

(dc, ch 3, dc) all in next ch-1 space.

because we already made one dc (which actually was a chain) in this corner.


Make ch 1 and a sl st into 3rd ch of beginning ch-4 to join.


The next round of the trim is going to be worked backwards as we will use a crab stitch for it. If you’re not familiar with this stitch, you might want to check the following article and video on how to make it


Crochet 2 crab stitches into each corner space and 1 crab stitch into each ch-1 space around. Make sure you make your crab stitches loose enough. 


To finish the round make a sl st into space between two dc.