Tuesday, March 26, 2013

Baby Booties with Gathered Strap and My Baby Gift


My husband’s coworker and his wife are expecting a baby boy next month. Of course, I could not miss an opportunity to make a baby gift as crocheting for babies is always so enjoyable and special.


I finished these lovely baby booties just a few days ago. The pattern, which I found easy to follow, was from this blog.


My baby present is now ready. If you follow my blog, you will recognize the blanket as the Lacy Baby Blanket that I posted about so many times before. The beanie is the V-Stitch Baby Beanie, see the pattern here.

All these items were made from a single ball of Snuggly Wuggly Big by Loops and Threads. And I actually still have a bit more of the yarn left.


I'm linking this post to Tweak It Tuesday @ Cozy Little House,
Homemaking Linkup @ Hope In Every Season
Adorned From Above Blog Hop @ Adorned From Above

Sunday, March 24, 2013

Lacy Baby Blanket Tutorial, Step 7


In the previous step, we left off having done 91 rows of the main pattern.

In this step, we will start making the trim, which consists of 4 rounds. Today, we will make the first one.


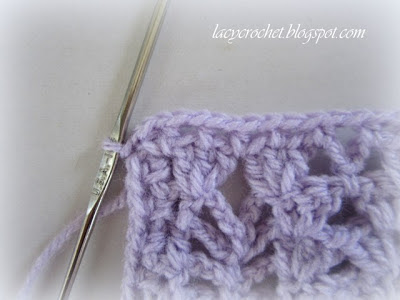
Do not turn. Look at the picture below to see in which direction to continue. As you can see, we are going to work into ends of rows. I used red yarn for demonstration purpose.


*ch 1, hdc* in each space across.

I use red yarn to demonstrate it.


And here, I use the main color yarn.


When you get to the end, make {ch 1, hdc} three times into the corner space.


Next, we continue working in the original chain. Here is how it goes here:

*ch 1, hdc into next shell, ch 1, hdc into ch-3 space, ch 1, hdc into next shell, ch 1, hdc into ch-3 space, ch 1, hdc into ch-3 space* across.

That is, we must have 5 hdcs per one pattern repeat. I use red yarn to demonstrate it in the next picture.


And here, I use the main color yarn.


Again, once you get to the end, make {ch 1, hdc} three times into the corner space. 

Next, we work into the end of rows.

*ch 1, hdc* in each space across.

Again, I show it with red yarn


and with the main color yarn. 


And again, we make {ch 1, hdc} three times in the corner space. 

Finally, we continue working into the last row.


*ch 1, hdc into 2nd dc of next shell, ch 1, hdc into space between two shells, ch 1, hdc into 2nd dc of next shell, ch 1, hdc into ch-3 space, ch 1, hdc into ch-3 space* across.


We must have 5 hdcs per one pattern repeat. See the picture below.


And here is what it looks like in the main color.  


When we get to the corner space, we make {ch 1, hdc} only two times as we already made one hdc into the corner space in the beginning of the entire round.

Make a sl st to join with the first hdc.


Thursday, March 21, 2013

Mother’s Day Crochet Gift Ideas


There are less than two months left till Mother’s Day! A handmade gift can save money, but most importantly its sentimental value will be priceless.  

I still don’t know what I’m going to give my mom and mother-in-law for Mother’s Day this year, but I’m already collecting some ideas.

In this list I share some of my crocheted works as well as some interesting projects that I found on the web.    


1. A table topper or big doily such as this Crocus Doily takes time to make but would make a gorgeous present.


2. A set of handkerchiefs with lace edgings would make a truly special and romantic gift. Sometimes you can find decent quality hankies even at dollar stores. Or you can make them entirely handmade.


 3. You can buy a set of towels and add crocheted lacy trims.


towels with crochet lace

4. A set of 100% cotton crocheted wash clothes look cute tied with a ribbon. Add a bar or two of high-quality soap and you’ll have a luxurious and practical gift. 

Talking about practical gifts, how about some kitchen accessories?

5. A teapot cozy would be a great one if your mom likes to have tea. This scalloped one seems to be popular on the Internet, but I’m sure there are other free patterns available too.

6. You can make a set of placemats. Here is a free pattern for easy and cute placemat decorated with a flower.

7. A market bag would be a useful gift. Check out this pattern.

8. The pair of decorative pillows shown bellow was a present for me from my mom. But this can work the other way too. You can buy a pair of small pillows and make lacy covers.


9. Or if you’d rather work with yarn, you can make a granny square accent cushion.  

10. I finish my list with a bookmark. It probably wouldn’t be much of a present on its own, but a pretty crocheted bookmark would be a lovely addition to a good book. 


I’d love to hear your ideas for crocheted Mother’s Day gifts.

I'm linking to
Home Sweet Home Friday @The Charm of Home,
Show and Tell Friday @ My Romantic Home,
 

Feathered Nest Friday @ French Country Cottage
Be Inspired Friday @ Common Ground
Link Your Stuff @ Annamarie's Haakblog
Tutorials, Tips and Tidbits @ Stone Gable
Thrifty Things Friday @ The Thrifty Groove

Tuesday, March 19, 2013

New Baby Blanket in Progress


This is the fifth baby blanket I’m crocheting this year. But unlike the previous ones, the work on this one is moving very slowly.

The winter months are over and the clock has been switched for the daytime savings, which means less crocheting time for me. The weather is warm and sunny, and I have started working in my garden.

Gardening is another lifelong hobby of mine. I grow flowers, vegetables, and berries. Earlier this year I planted three fruit trees.

But back to the blanket.
It’s my own pattern, and I write down notes along crocheting. Once the blanket is finished, I’ll share the pattern. I use Snuggly Wuggly yarn by Loops & Threads. In the picture, the color seems cream, but in reality it’s bright yellow.

My babies are taking their naps right now, so I’m off to the garden.
I hope you all are having a great week!


Sunday, March 17, 2013

Lacy Baby Blanket Tutorial, Step 6


If you have gotten this far without any trouble, the rest should be a piece of cake!


From now on, we are going to repeat our pattern starting with Row 2 and ending with Row 7. We need to repeat the pattern additional 14 times. That will give us the total of


7 + 6*14 = 91


91 rows!


The picture below shows Rows 2-7 worked one additional time. That is 13 rows in total (7 + 6 = 13)


And this picture shows how my baby blanket is growing in size, but it’s not big enough yet.


And finally here I have 91 rows!


Thursday, March 14, 2013

Croco Flower


I’m not sure why this flower is called “croco”. But I think “croco” is short for crocodile. The petals of this flower resemble crocodile stitch, and perhaps that’s where the flower got its name.


The pattern was designed and shared by Bonita Patterns. Click here to see the free pattern.


The flower was quick to make and the pattern was straightforward to follow.
However, the petals on my flower didn’t come out as pointy as in the original pattern. I guess it depends on what kind of yarn one uses. But otherwise I love this pattern!

I'm linking to
Home Sweet Home Friday @The Charm of Home,
Show and Tell Friday @ My Romantic Home,
 

Feathered Nest Friday @ French Country Cottage
Be Inspired Friday @ Common Ground
Link Your Stuff @ Annamarie's Haakblog
Tutorials, Tips and Tidbits @ Stone Gable
Thrifty Things Friday @ The Thrifty Groove


Monday, March 11, 2013

Easter Egg Crochet Ornament


To make these eggs, I used small amounts of yarn (Snugly Wuggly by Loops & Threads, and Pound of Love by Lion Brand)  left from the baby blankets I made. Soft baby colors were perfect for making Easter eggs.


The size is about 1 ¾ by 1 ½ inches. And I used US size E hook.


Ch 5, join into a ring with a sl st.


Working into ring: ch 3, dc, tr, ch 1 ,tr, 11 dc; join with a sl st into 3rd ch of beginning ch-3.


Fasten off. Wave in the end.


Sunday, March 10, 2013

Lacy Baby Blanket Tutorial, Step 5

In this step, we crochet Row 7.


We begin by working the instructions prior to *, which read:


3 dc in next dc


Next we work the instructions from * to second *, which read:


*3 dc in next dc, ch 3, sc in space between next 2nd and 3rd dc, ch 3, skip next 2 dc, 3 dc in next dc*


The picture below shows instructions from * to second * worked one time.


Worked two times


We need to work the instructions from * to second * the total of 12 times. Once we have done that, the end of the row looks like this


We finish the row by executing the instructions after second *, which read:


3 dc in next dc, dc in next dc. Ch 2, turn.


Congratulations! You finished Row 7 and the entire pattern repeat!


Wednesday, March 6, 2013

Tablecloth Update


It feels like I’ve been crocheting this tablecloth forever. My original deadline date was Christmas, but of course that never happened. I no longer give myself deadlines but rather work on it in between my other crochet projects.


I now have 9 motifs done. Here I placed them next to each other on my table and they cover half of it. I’m still not sure if should make the tablecloth 3 or 4 motifs wide.

Three motifs barely cover the width of the table, but there is going to be trim crocheted as well. What is more, I should take into account that the tablecloth will stretch once I block it.


This is the mistake I made with this round tablecloth. As I was crocheting it, I intentionally made it bigger to fit my outside round table. I wanted the row of the pineapples to start right at the edge of the table.

But look what happened after I blocked it. The pineapples are way too low!


Crochet Tablecloth


I was telling my mom the other day that I want to unravel this tablecloth and make it all over, but smaller, so that it would fit the table perfectly. To which my mom replied: Don’t you dare!

The pattern for the tablecloth I'm working on right now is here

I'm linking this post to Open House link party at Bernideen's Tea Time Blog.

Monday, March 4, 2013

Lacy Baby Blanket Tutorial, Step 4


In this step, we crochet Row 5 and Row 6.


First, we execute the instructions prior to first *, which read:


dc in next dc


Next, we execute the instructions from * to second *, which read:


*ch 3, sc in next sc, ch 3, 3 dc in next dc, skip next 4 dc, 3 dc in next dc*


The picture below shows instructions from * to second * worked one time.


Worked two times 


We need to work the instructions from * to second * the total of 12 times. Once we have done that, the end of the row looks like this


We finish the row by executing the instructions after second *, which read:


ch 3, sc in next sc, ch 3, dc in next 2 dc. Ch 2, turn.


We are done with Row 5! Row 6 is identical to Row 5, so you shouldn’t have any trouble.


Here is the beginning of my Row 6 (the instructions from * to second * worked twice)


And this is what your work should look like when six rows are completed


I will post Step 5 next week.

Friday, March 1, 2013

Spider Stitch Shawl Free Pattern


First of all, I want to let you know that I recently turned on comment moderation for the posts older than two weeks as my blog has been bombarded by spammers. If you don’t see you comment appear right away, don’t worry, I will still see it.

Now to my recent crochet project and its pattern.


This Spider Stitch Shawl looks prettier in reality than in the pictures. I used Vanna’s Glamour yarn by Lion Brand, which has metallic polyester thread added. The shawl indeed looks glamorous. But the pictures don’t do it justice and show it rather as boringly grey. 


Now let me tell you how I made this shawl. There were four steps:

First, I crocheted the triangle using spider stitch.

Then, I made edging along two shorter sides of the triangle.

Next, I crocheted one round of single crochets around all three sides.

And finally, I added fringe (which was the most boring part).

As I was crocheting, I took detailed notes, so I could write the pattern. I didn’t have difficulty with the spider stitch, but I did have some trouble writing the pattern for the edging and especially the final round of single crochets.


As you can see from the pictures, the edging itself is not elaborate; it’s just four rows of simple mesh. And what’s too difficult about making a round or single crochets?

But I did have trouble writing down how to make the spacing between the stitches even, especially along the longest side of the triangle. I apologize if that part of the pattern is not very clear. 

But as I said, the edging is simple and perhaps you can make it without the pattern. Or, perhaps, you can come up with your own, fancier edging.

You are welcome to use my pattern to make shawls for personal use or for sale. But if someone asks you about the pattern, please refer them to my blog. Thank you!


Size: 62 inches wide, 35 inches long (not including fringe)

Materials:
Vanna’s Glamour by Lion Brand, Color 150 Platinum, 7 balls
US size E/4 (3.50mm) hook

Row1: Ch 4, 2 dc in fourth ch from hook. Ch 3, turn.

Row 2: 2 dc into first st of row, ch 4, 3 dc into last dc. Ch 3, turn.

Row 3: 2 dc into first st of row, ch 6, 3 dc into last dc. Ch 3, turn.

Row 4: 2 dc into first st of row, ch 8, 3 dc into last dc. Ch 3, turn.

Row 5: 2 dc into first st of row, ch 4, skip 1 dc, 3 dc in next dc, ch 2, sc in ch-4 space grabbing all three chains of previous rows, ch 2, 3 dc in next dc, ch 4, 3 dc into last dc. Ch 3, turn.

Row 6: 2 dc into first st of row, ch 6, skip next 4 dc, 3 dc in next dc, ch 1, 3 dc into next dc, ch 6, 3 dc into last dc. Ch 3, turn.

Row 7: 2 dc into first st of row, ch 8, 3 dc into ch-1 space, ch 8, 3 dc into last dc. Ch 3, turn.

Row 8: 2 dc into first st of row, *ch 4, skip 1 dc, 3 dc into next dc, ch 2, sc into ch-4 space grabbing all three chains or previous rows, ch 2, 3 dc in next dc* 2 times, ch 4, 3 dc into last dc. Ch 3, turn.

Row 9: 2 dc into first st of row, *ch 6, skip next 4 dc, 3 dc in next dc, ch 1, 3 dc into next dc* 2 times, ch 6, 3 dc into last dc. Ch 3, turn.

Row 10: 2 dc into first st of row, *ch 8, 3 dc into ch-1 space* 2 times, ch 8, 3 dc into last dc. Ch 3, turn. 

Repeat Rows 8 through 10 increasing executing instructions from * to * by one. 

For example, in the rows 11, 12, and 13 you will need to execute instructions from * to * three time. In the rows 14, 15, and 16, you will need to execute these instructions four times. And so on.

Continue crocheting your triangle until you have 90 rows in total.

Row 91: 2 dc into first st of row, *ch 4, sc into ch-4 space grabbing 2 chains of previous rows, ch 4, 3 dc into ch-1 space* 29 times, ch 4, sc into ch-4 space grabbing 2 chains of previous rows, ch 4, 3 dc in last dc.

Don’t make turning ch 3 in the last row.

Edging:
Continue crocheting along the shorter sides of the triangle.

Row 1: Ch 4, dc in same space, *ch 2, dc* in end of each row across; (dc, ch 5, dc) all in corner space; *ch 2, dc* in end of each row across. Make (ch 2, dc, ch 1, dc) all in the end of last row. Ch 5, turn.

Row 2: Dc in next dc, *ch 2, dc in next dc* across; (ch 2, dc, ch 5, dc) all in third ch of corner ch-5; *ch 2, dc in next dc* across. Ch 4, turn.

Row 3: dc in same space, *ch 2, dc in next dc* across; (ch 2, dc, ch 5, dc) all in third ch of corner ch-5; *ch2, dc in next dc* across; (ch 2, dc, ch 1, dc) all in the last stitch. Ch 5, turn.

Row 4 same as Row 2, but don’t make turning ch 4 at the end of the row.

Now we are going to make one round of single crochets at the perimeter of the entire triangle (this is the part I warned you about in the beginning of this post).

Ch 1, turn.
2 sc in next ch-2 space across; 4 sc into corner space, 2 sc in next ch-2 space across; 4 sc into next corner space. Continue crocheting along the longest side of the triangle: *2 dc in next space* three times (those were the spaces of the three rows of the edging).

Now continue crocheting into the last row of the spider stitch pattern. *Skip next dc, sc in next space, 3 sc in next ch-4 space, 3 sc in next ch-4 space* across. Skip next dc, sc in next space.

*2 dc in next space* four times (the spaces of four rows of the edging). Sl st to join. Fasten off.

Fringe:
If you have never made fringe before, I recommend you check out Youtube for some related videos first.

Cut yarn into strands 18 inches long.

Stretch your shawl on a surface the wrong side up. Take three strands of yarns at a time and make fringe in corner space and into every other ch-2 space of the edging.  Then tie the fringe into knots as shown in the picture below.


Trim the ends if needed.


More shawl patterns from my shop: