Thursday, August 29, 2013

Super Easy Crochet Stitch


Another stitch for my collection


Multiple of 5, plus 2

Row 1: sc in 2nd ch from hook, *ch 5, skip 4 ch, sc in next ch* across. Ch 3, turn.

Row 2: 5 dc in next ch-space, *ch 1, 5 dc in next ch-space* across; dc in last sc. Ch 1, turn.

Row 3: sc in same beginning space, ch 5, *sc in next ch-1 space, ch 5* across; sc in last dc. Ch 3, turn.

Repeat Row 2 – Row 3.


Tuesday, August 27, 2013

Sharp Crochet Hook Review


Disclosure: I received a free Sharp Crochet Hook and Pattern Book ($10.99 value) to test and write a review. The opinions expressed below are completely my own based on my own experience.

A couple of weeks ago I was offered to write a review for a Sharp Crochet Hook, a special kind of hook for crocheting through fabrics. I agreed to test the hook and write a post sharing my honest opinion.


As I received the hook in the mail, I opened the packaging right away and closely examined the hook. I noticed that the hook has a distinct pointy head, though I realized it’s not as sharp as I expected it to be.


Next, I tried the hook on different fabrics. First on a towel as I wanted to add some lacy charm to my bath towels for a while. I must admit I was disappointed. The hook does pierce the thick towel texture, but I expected it to do it with more ease. I had to employ some effort in piercing it through. 

Next I tried poking holes with the Sharp Crochet Hook on an old receiving blanket. I just wanted to see how it would work on flannel. It worked better than on the towel! 

Finally, I decided to make a complete project using the Sharp Crochet Hook. I have some dinner napkins that I wanted to add crochet trim to. The fabric of the napkins is 50% cotton, 50% polyester blend, and I used size 10 crochet cotton thread. At first it was quite difficult, but as I progressed it became better.


To make this lacy edging, I made a round of single crochets directly into the napkin edges using the Sharp Crochet Hook. Then I switched to a steel hook size 1.25 mm to make the lace trim.


To see how the Sharp Crochet Hook works compared to a regular hook, I tried crocheting the edge with a regular steel hook size 1.25 mm, which looks slightly smaller than the Sharp Crochet Hook. I don’t know what size the sharp hook is as it doesn’t say neither on the hook, nor on the pattern book. 

I found that the pointy head of the Sharp Crochet Hook has an advantage over the regular size 1.25 mm hook. Though I realized that with a bit more effort it’s still possible to make the trim with the regular hook.


My conclusion: The pointy head of the Sharp Crochet Hook is an advantage!

However,

* The head is not sharp enough to easily pinch the fabric. 


* The Sharp Crochet Hook comes only in one (unknown) size, which doesn’t work equally well with different kinds of fabrics. For example, this hook would not work with a delicate handkerchief fabric as it leaves big holes. It would be more practical if the hook came in different sizes. 

*With only a bit of extra effort, a regular steel hook size 1.25 mm can be a thriftier option (especially if you already own it).

Saturday, August 24, 2013

Lacy Infinity Scarf, my free crochet pattern


I finished my infinity scarf!

But it’s still at least a couple of months before I will be able to wear it as autumn arrives late to California. I’m not in a hurry though and I’m very much enjoying summer days. 

I’m more than pleased with how my scarf turned out. It’s soft and nice to touch. And it definitely looks much better on me than on the hanger in the photos. I might post more pictures once I actually get to wear my scarf.


This pattern is my original design. It cannot be posted on other sites or distributed in any other form. If you would like to share this pattern, you can post ONE image on your site with the link to my original post. You can use this pattern to make items for personal use or for sale. If you sell finished items from this pattern, you must give design credit to Lacy Crochet blog (lacycrochet.blogspot.com). Please, respect my work. Thank you!

Skill Level: Easy

Size: about 9.5 inches wide, about 65 inches long (before stitching) 


Materials: Baby Alpaca Worsted Glow yarn in Olive by Plymouth Yarn, 5 balls (500 yards)


Crochet Hook US size F (3.75 mm)


Shell in this pattern: (2 dc, ch 2, 2 dc) all in same space.

Ch 58 loosely.


Row 1: shell in 6th ch from hook, *ch 3, skip 5 ch, sc in next ch, ch 3, skip 5 ch, shell in next ch* across, skip 3 ch, dc in last ch.


Row 2: ch 6, turn; *sc in next shell, ch 3, shell in next sc, ch 3* across, end with sc in last shell, ch 3, dc in last dc (Note, here by last dc I actually mean the turning ch, so in Row 2 make last dc in top of turning chain. But starting from Row 4 and onward, make last dc into 2nd (not 3rd) ch of turning ch-3. This way you will have a nice, straight edge). 


Row 3: ch 3, turn; *shell in next sc, ch 3, sc in next shell, ch 3,* across, end with shell in next sc, dc into 2nd (count from bottom) ch of turning ch-6.


Repeat Row 2 – Row 3 until your scarf measures about 65 inches, ending with Row 2. Fasten off, but leave a tail long enough to stitch the shorter ends of the scarf together (about 18-20 inches).


Lay your scarf on a flat surface. Flip one side to form a twist. Stitch the shorter ends together using a tapestry needle. Wave in the ends.


January 2014 update: if you need help with this pattern, check out my photo tutorial


~~~~~~~~~~~~~~~~~~~~~


Crochet Patterns from my Shop

Thursday, August 22, 2013

Vintage Ukrainian Rushnyks with Crochet Trims


This coming Saturday, August 24, Ukraine will celebrate its independence.  

For many centuries Ukraine was a part of the Russian Empire. Back in the 18th and 19th centuries, Ukraine was even referred to as Malorossia (“Little Russia”). In the early 20th century when the Russian Empire collapsed, Ukraine struggled to gain its independence, but it wasn’t meant to happen. And only after the fall of the Soviet Union in 1991, Ukraine finally became an independent country.

I was born and grew up in Ukraine. And even though I have lived in the USA for over a decade now, my Ukrainian heritage is very important to me. What is more, I want to pass it on to my children.  Each year on August 24, we celebrate our Ukrainian heritage and ancestry.

Today I want to show you beautiful Ukrainian rushnyks (handmade towels that are used for ceremonial events or decorating), which I received from my aunt when I left Ukraine.


Isn’t that embroidery gorgeous? The colors faded on the small rushnyk in the middle, but the other two are still quite bright.

Notice the crocheted trims. They shrank with the time and the original snow-white color changed to brownish yellow. And yet I find them very beautiful and special.


I will use these rushnyks to decorate my dining room for the upcoming celebration. Here is a picture that I took a few years ago, when I used one of the rushnyks as a table runner for my Ukrainian tablescape.  


Ukrainian table setting


When I was a child, I remember my grandparents’ small hut in the Ukrainian countryside decorated with lots of rushnyks. My grandmother hanged rushnyks on the walls over the icons (religious depictions of Jesus Christ, Mary, or Saints) as well as over collages of old photographs. In a huge old chest she had even more rushnyks, embroidered gowns and linens with crocheted trims. I wonder now what ever happened to all those things.

I'm linking to Link Your Stuff @ Annamarie's Haakblog
Show and Tell Friday @ My Romantic Home,

Monday, August 19, 2013

Butterfly Baby Hat


The pattern for this adorable baby hat is from a fellow blogger/crocheter Alli. On her blog AlliCrafts, she kindly shared the patterns for this hat in sizes preemie, newborn, 3 months, and 6 months.

I made my hat in size newborn using leftover Snuggly Wuggly yarn by Loops and Threads. 

I now have quite a collection of baby hats, which I will be sending to a charity later this year.


~~~~~~~~~~~~~~~~~~~~~~~~

And here are some easy baby hat patterns from my shop:


Wednesday, August 14, 2013

Crochet Green Baby Blanket, free pattern


Another baby blanket is ready!


I borrowed the Teddy Bear and small chair for the pictures from my youngest son. Too bad he is too old (he’s 2 years old now) to be wrapped in this darling baby afghan.  


I tried to do my best to write the pattern, but mistakes and typos are possible. I didn’t have anyone proof-read or test the pattern. If something doesn’t make sense, don’t hesitate to ask in the comments or in an e-mail.

I would rate the skill level for this blanket as advanced. In this pattern I used 2-dc clusters (two unfinished dc made in same space, then finished together) as well as 2dctog (two unfinished dc made in two different spaces, then finished together). The ends of rows are somewhat challenging too. 

In case you would like to use this stitch pattern for another project, it’s a multiple of 6, plus 2.  


This pattern is my original design. It cannot be posted on other sites or distributed in any other form. If you would like to share this pattern, you can post ONE image on your site with the link to my original post. You can use this pattern to make items for personal use or for sale. If you sell finished items from this pattern, you must give design credit to Lacy Crochet blog (lacycrochet.blogspot.com). Please, respect my work. Thank you!


Finished Size: approximately 38 inch (96.5 cm) square


Snuggly Wuggly Big by Loops and Threads, 1 ball (1263 yards/1154 m)


US hook G/6


Ch 128 loosely.


Row 1: sc in 2nd ch from hook, *ch 1, skip 2 ch, (dc2-tog, ch 1, dc2-tog, ch 1, dc2-tog) all in next ch, ch 1, skip next 2 ch, sc in next ch* across. Ch 3, turn.


Note: After you make (dc2-tog, ch 1, dc2-tog, ch 1, dc2-tog) all in one ch, the next ch may become very small and hardly visible. So make sure you are skipping 2 ch and not 3!

When Row 1 is finished you must have 18 pattern repeats!


Row 2: dc in next ch-1 space, *ch 1, sc in next ch-1 space, ch 3, sc in next ch-1 space, ch 1, dc2-tog over next two ch-1 spaces* across; end with ch 1, dc2-tog over next ch-1 space and last sc. Ch 2, turn.


Row 3: (dc, ch 1, dc2-tog) all in same beginning space, *ch 1, sc in next ch-3 space, ch 1, (dc2-tog, ch 1, dc2-tog, ch 1, dc2-tog) all in next dc2-tog* across; end with ch 1, (dc2-tog, ch 1, dc2-tog) all in space between last 2 dc. Ch 1, turn.


Row 4: sc in first stitch, *sc in next ch-1 space, ch 1, dc2-tog over next two ch-1 spaces, ch 1, sc in next ch-1 space, ch 3* across; end with sc in next ch-1 space, sc in last dc. Ch 1, turn.


Row 5: sc in same beginning space, *ch 1, (dc2-tog, ch 1, dc2-tog, ch 1, dc2-tog) all in next dc2-tog, ch 1, sc in next ch-3 space* across; end with sc in last sc. Ch 3, turn.


Repeat Row 2 – Row 5 until you have made 84 rows in total. You must end with Row 4.


Trim


First Round:


Working in last row: hdc in same beginning space, ch 1, skip next sc, *hdc in next dc2-tog, ch 1, hdc in next ch-1 space, ch 1, hdc in next ch-3 space, ch 1, hdc in next ch-1 space, ch 1* across; end with {ch 1, hdc} 3 times in corner space.


Working in end of rows: *ch 1, hdc* in each end of row across; {ch 1, hdc} 3 times in corner space.


Working in original chain: *ch 1, hdc in next ch-space, ch 1, hdc in space where clusters were made, ch 1, hdc in next space where sc was made* across; {ch 1, hdc } 3 times in corner space.


Working in end of rows: *ch 1, hdc* in each end of row across; {ch 1, hdc} 2 times in corner space, ch 1, sl st to join round.


Second Round:


Ch 3, *dc in next ch-1 space, dc in next hdc* around, making 3 dc in each corner.

Fasten off.


More baby blanket patterns from my shop: 


Tuesday, August 6, 2013

Crochet Lace Trim, free pattern


Here is a simple lace trim that can be used for many different projects. You can make it as long or as short as you like.

I crocheted it with pearl cotton thread and size 2 steel hook. Then I wrapped it around a small jar. Isn’t it a lovely vase?


And here are a couple more ideas for this simple trim.


A bookmark!


A napkin ring!

And here is the pattern.

Ch 16.

Row 1: dc in 5th ch from hook, dc in next ch, ch 3, skip 2 ch, sc in next ch, ch 1, skip 1 ch, sc in next ch, ch 3, skip 2 ch, dc in last 3 ch. Ch 1, turn.

Row 2: sc in same beginning space, ch 2, skip next dc, sc in next dc, ch 3, dc in ch-1 space, ch 3, sc in next dc, ch 2, hdc in last dc. Ch 3, turn.

Row 3: dc in next ch-2 space, dc in next sc, ch 3, sc in 3rd ch of next ch-3, ch 1, skip next dc, sc in next ch, ch 3, dc in next sc, dc in next ch-2 space, dc in last sc. Ch 1, turn.

Repeat Row 2 – Row 3.


More bookmark/edging patterns from my shop:


Saturday, August 3, 2013

Crochet Stitch Collection


I want to create a wide collection  of crochet stitches on my blog, so both my readers and I can refer to it when in need of a stitch pattern for a new project. Here is another stitch I’m adding to it.

I think it can be used for afghans and throws, baby blankets, scarves, and even crochet sweaters.


In this pattern I refer to turning ch 3 as “last dc”.

Multiple of 10, plus 4, plus 5 for symmetry

Row 1: dc in 4th ch from hook, dc in next 4 ch, *skip 2 ch, (dc, ch 5, dc) all in next ch, skip 2 ch, dc in next 5 ch* across; dc in last ch. Ch 3, turn.

Row 2: dc in next 5 dc, *ch 2, sc in ch-5 space, ch 2, skip next dc, dc in next 5 dc* across; dc in last dc. Ch 3, turn.

Row 3: skip 2 dc, (dc, ch 5, dc) all in next dc (it’s the 3rd dc of dc-5 group), *2 dc in next ch-2 space, dc in next sc, 2 dc in next ch-2 space, skip 2 dc, (dc, ch 5, dc) all in next dc (it’s the 3rd dc of dc-5 group)* across; dc in last dc. Ch 5, turn.

Row 4: sc in ch-5 space, ch 2, *dc in next 5 dc, ch 2, sc in ch-5 space, ch 2* across; dc in last dc. Ch 3, turn.

Row 5: 2 dc in ch-2 space, dc in next sc, 2 dc in ch-2 space, *skip 2 dc, (dc, ch 5, dc) all in next dc, 2 dc in ch-2 space, dc in next sc, 2 dc in ch-2 space* across; dc in 3rd ch of turning ch-5. Ch 3, turn.

Repeat Row 2 - Row 5.


Thursday, August 1, 2013

My Shortcut to Blocking Doilies and Free Vintage Pattern


I always block my doilies though I don’t use the fancy technique with round charts, pins, and padded surfaces. I do it in a much simpler way!


I lay a big towel on the table (in summer I do it on my patio table; in winter I do it indoors). Next I wet my doily and gently squeeze out the excess water. Then I put the doily on the towel and straighten it. I gently stretch it, pat it, and shape it until it looks round and even to me. I leave it to dry. That’s it!

Here is a photo of my doily right after I finished crocheting it.


And here is the same doily after I blocked it using my simple and quick technique.


If you ever wash your doilies, you can then use this same method to dry them.

And if you want to stiffen your doily a bit, just spray on it some spray-on starch after you straightened your doily on the towel.

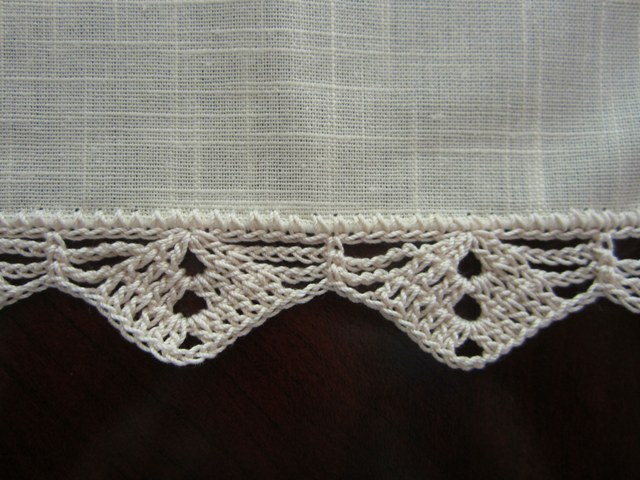
I found the pattern for the doily pictured above here. Since this vintage pattern is no longer covered by the copyright and is in the public domain, I repost the pattern below.


Starting at center, ch 8. Join with sl st to form ring.

1st Rnd: Ch 6 (to count as tr and ch 2), 11 tr in ring with ch-2 between, ch 2, sl st in 4th st of ch-6.

2nd Rnd: Sl st in next ch, sl st in sp, ch 8, *tr in next sp, ch 4. Repeat from * around. Join last ch-4 with sl st in 4th st of starting chain.

3rd Rnd: Sl st in next 2 ch, sl st in sp, ch 10, * tr in next sp, ch 6. Repeat from * around. Join.

4th Rnd: Sl st in sp, ch 4, 5 tr in same sp, * ch 3, 6 tr in next sp. Repeat from * around. Join.

5th Rnd: Ch 9, * skip 4 tr, tr in next tr, 5 tr in sp, tr in next tr, ch 5. Repeat from * around, ending with 5 tr in last sp. Sl st in 4th st of starting chain.

6th Rnd: Ch 8, * tr in next 3 tr, in next tr make tr, ch 2 and tr; tr in next 3 tr, ch 4. Repeat from * around. Join.

7th Rnd: Ch 7, * tr in next 3 tr, 2 tr in next tr, ch 3, 2 tr in next tr, tr in next 3 tr, ch 3. Repeat from * around. Join.

8th Rnd: Ch 6, * tr in next 4 tr, (4 tr in next tr) twice; tr in next 4 tr, ch 2. Repeat from * around. Join.

9th Rnd: Sl st in next ch, sl st in sp, ch 7, * holding back the last loop of each tr on hook make tr in next 4 tr, thread over and draw through all loops on hook (4-tr cluster made), ch 3, tr in next 8 tr, ch 3, make a 4-tr cluster as before over next 4 tr, ch 3, tr in sp, ch 3. Repeat from * around. Join.

10th Rnd: Ch 8, tr in same place as sl st, ch 5, tr in next 8 tr, ch 5, 7 tr in next single tr, ch 5, tr in next 8 tr, ch 5, in next single tr make tr, ch 4 and tr. Repeat from * around. Join.

11th Rnd: Ch 4, 4 tr in same place as sl st, * ch 5, 5 tr in next tr, ch 5, make an 8-tr cluster over next 8 tr, ch 5, in next tr make tr, ch 1 and tr; (ch 1, tr in next tr) 5 times; ch 1, in next tr make tr, ch 1 and tr; ch 5, make an 8-tr cluster as before, ch 5, 5 tr in next tr. Repeat from * around. Join.

12th Rnd: Ch 4 (to count as tr), holding back the last loop of each tr on hook make tr in next 4 tr and complete a 5-tr cluster, * ch 3, 5 tr in center st of next ch-5, ch 3, make a 5-tr cluster over next 5 tr, ch 5, in tip of next cluster make tr, ch 3 and tr; ch 5, tr in next 9 tr with ch-2 between, ch 5, in tip of next cluster make tr, ch 3 and tr; ch 5, 5-tr cluster over next 5 tr. Repeat from * around. Join.

13th Rnd: Sl st in next 3 ch and in next tr, ch 4, tr in next 4 tr, * ch 5, skip next cluster, tr in next sp, (ch 3, tr in next sp) twice; (ch 3, 3-tr cluster in next sp) 8 times; (ch 3, tr in next sp) 3 times; ch 5, tr in next 5 tr. Repeat from * around. Join.

14th Rnd: Ch 4 and complete 5-tr cluster as before, * ch 3, in next sp make tr, ch 3 and tr, (ch 3, tr in next sp) 3 times; ch 10, skip 4 clusters, in next sp make tr, ch 4 and tr; ch 10, skip 4 clusters, tr in next sp, (ch 3, tr in next sp) 3 times; ch 3, tr in same sp where last tr was made, ch 3, 5-tr cluster over next 5 tr. Repeat from * around. Join last tr with dc in tip of 1st cluster made.

15th Rnd: Sl st in sp, ch 11, * tr in next sp, (ch 3, tr in next sp) 5 times; (ch 5, 7 tr in next tr) twice; ch 5, tr in next sp, (ch 3, tr in next sp) 5 times; ch 7. Repeat from * around. Join last ch-3 with sl st in 4th st of ch-11.

16th Rnd: Sl st in sp, ch 11, tr in same sp, * (ch 3, tr in next sp) 5 times; ch 7, make a 7-tr cluster over next 7 tr, ch 5, 7 tr in center st of next ch-5, ch 5, make a 7-tr cluster over next 7 tr, ch 7, skip next sp, (tr in next sp, ch 3) 5 times; in next sp make tr, ch 7 and tr. Repeat from * around. Join last tr with dc in 4th st of starting chain.

17th Rnd: Sl st in sp, ch 7, * make 7 tr in center st of next sp, (ch 3, tr in next sp) 5 times; ch 7, sc in tip of cluster, ch 7, tr in next 7 tr, ch 7, sc in tip of next cluster; ch 7, skip 1 sp, tr in next sp, (ch 3, tr in next sp) 4 times; ch 3. Repeat from * around. Join with dc as before.

18th Rnd: Sl st in sp, ch 9, * tr in next 7 tr with ch-1 between, ch 5, skip 1 sp, tr in next sp, (ch 3, tr in next sp) 3 times; ch 7, sc in next sc, ch 11, make a 7-tr cluster over next 7 tr, ch 11, sc in next sc, ch 7, skip next sp, tr in next sp, (ch 3, tr in next sp) 3 times; ch 5. Repeat from * around. Join with dc as before.

19th Rnd: Sl st in sp, ch 11, * in next tr make tr, ch 2 and tr, (ch 2, tr in next tr) 5 times; ch 2, in next tr make tr, ch 2 and tr, ch 7, skip 1 sp, tr in next sp, (ch 3, tr in next sp) twice; ch 9, sc in next sc, 15 sc in each of next 2 ch-11 loops, sc in next sc, ch-9, skip 1 sp, tr in next sp, (ch 3, tr in next sp) twice; ch 7. Repeat from * around. Join with dc as before.

20th Rnd: Sl st in next sp, ch 11, * (make a 3-tr cluster in next sp, ch 3) 7 times; 3-tr cluster in next sp, ch 7, tr in each of next 2 ch-3 sps, ch 11, dc in next sc, (ch 2, skip 2 sc, dc in next sc) 5 times; ch 5, dc in next sc, (ch 2, skip 2 sc, dc in next sc) 5 times; ch 11, tr in each of next 2 ch-3 sps, ch 7. Repeat from * around. Join last tr with sl st to 4th st of starting chain.

21st Rnd: Ch 1, sc in same place as sl st, * ch 7, tr in next sp, (ch 5, tr in next sp) 8 times; ch 7, skip 1 tr, sc in next tr, ch 11, (dc in next ch-2 sp, ch 2) 5 times; in next sp make dc, ch 5 and dc, (ch 2, dc in next sp) 5 times; ch 11, skip 1 tr, sc in next tr. Repeat from * around, ending with sl st in 1st sc made.

22nd Rnd: Ch 1, sc in same place as sl st, * ch 7, skip next sp, (make a 5-tr cluster in next sp, ch 7) 8 times; sc in next sc, ch 13, (dc in next ch-2 sp, ch 2) 5 times; in next sp make dc, ch 5 and dc, (ch 2, dc in next sp) 5 times; ch 13, sc in next sc. Repeat from * around. Join and fasten off. 


I'm linking this post to
Link Your Stuff @ Annamarie's Haakblog
Show and Tell Friday @ My Romantic Home,