Monday, September 21, 2015

Lacy Baby Sacque, Free Vintage Pattern


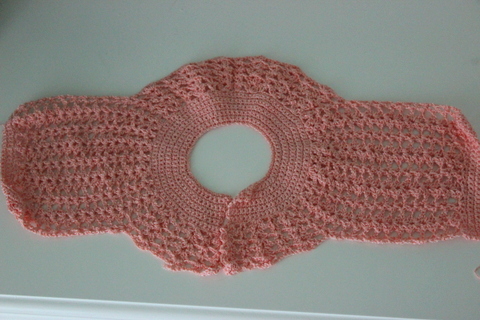
A couple of weeks ago I made a lacy bonnet (shown bellow), and now I made a matching baby jacket. 

The pattern was from Woollies for Babies, Book No. 197, Chadwick's Red Heart Wools, by The Spool Cotton Company, 1943.


I used the same yarn as for the bonnet, which was a leftover category 1 yarn from my stash. I'm not sure what size hook I used. I just went alone with a steel hook that felt comfortable for this yarn. It's a vintage hook, and all it says on it is "Boye 1", and on the other side "U.S.A. 10 cents".  

The pattern is not difficult, however it's not a very detailed one. So I wouldn't recommend it to novices. Otherwise, this baby sacque was fun to make. And it looks adorable on my 20-inch doll. 

The original pattern suggests to make three button loop and sew on three buttons, but I only went with two.


GAUGE: (Yoke) 5 sc make 1 inch; 5 rows make 1 inch.

YOKE … Ch 56 tightly to measure 9 inches. 1st row: Sc in 2nd ch from hook and in next 7 ch, * sc in same ch, sc in next 8 ch. Repeat from * to end (61 sc). Ch 1, turn. 2nd row: Sc in each sc, in­creasing 6 sc evenly around. Ch 1, turn. Repeat the 2nd row (but do not make increases directly above previous in­creases) until Yoke measures 2 inches and there are 115 sts. Ch 3, turn. Next row: Dc at base of ch-3, ch 1, 2 dc in same place, * ch 1, skip 2 sc, in next sc work 2 dc with ch-1 between (small shell made), ch 1, skip 2 sc, in next sc work 2 dc, ch 2 and 2 dc (large shell made). Repeat from * across (20 large shells in row). Turn. Following row: Sl st in next st and in next sp. Ch 3, in same sp work dc, ch 1 and 2 dc, then * ch 1, work small shell in sp of next small shell, ch 1, work large shell in sp of next large shell. Repeat from * across. Repeat the last row 3 more times (5 rows of shells). Fasten off. 


SLEEVE … 1st row: Skip 3 large shells, attach yarn in sp of next small shell, ch 4, dc in same sp, ch 1, large shell in sp of next large shell. Continue in pattern across until there are 4 large shells, then work small shell in sp of next small shell. Turn. 2nd row: Sl st in sp, ch 4, dc in same sp and continue in pattern across. Repeat the 2nd row until Sleeve measures 4½ inches. Ch 1, turn. Next row: Work 3 sc in ch-1 sp of each shell (27 sc). Ch 1, turn. Following row: Sc in each st across. Ch 1, turn. Repeat the last row 2 more times. Fasten off. Skip 6 large shells, attach yarn to next small shell and work other Sleeve to correspond. Fasten off. 


BODY … Attach yarn to sp of 1st large shell and work in pattern until there are 3 large shells. Ch 1, work small shell in same place where 1st small shell of sleeve was worked, ch 1, small shell in same place where last small shell of sleeve was worked (thus joining) and continue in pattern across, joining 2nd underarm in same way. Turn. Next row: Work in pattern until there are 3 small shells, ch 1, work large shell in ch-1 at underarm, ch 1 and continue in pattern across, making another large shell at other underarm. Turn. Work in pattern until work measures 7 inches from bottom of Yoke. Next row: Sl st in next st and in next sp. Ch 3, dc in same sp, ch 3, sc in 3rd ch from hook (picot made); 2 dc in same sp, * ch 1, dc in sp of small shell, picot, dc in same sp, ch 1, 2 dc in sp of large shell, picot, 2 dc in same sp. Repeat from * across. Fasten off.    Work a row of sc along front edge of right side of yoke, making three ch-2 button loops. Sew sleeve seams.


I'm linking to
Link Your Stuff @ Annamarie's Haakblog
Crafting Along @ Be a Crafter


Friday, September 18, 2015

Crochet Clusters Tutorial: dc-3-tog, dc-4-tog, tr-5-tog


Crochet clusters are very simple to make. But beginner crocheters might need visual help. So here is a my photo tutorial for you!


I start with a row of single crochets as my base to work my clusters into. 


Beginning dc-3-tog: to make a 3-double crochet cluster, I start with ch 2 (it counts as 1st dc).  


Next I make a dc into the same beginning space, but I don't finish my dc, leaving the last loop on the hook.


And I make another dc into the same space, again leaving its last loop unfinished on the hook.


And finally I draw yarn through all three loops on the hook. Thus, beginning dc-3-tog cluster is made! 


Dc-3-tog: to make my next 3-double crochet cluster I make 3 unfinished double crochets into the same space, now I have four loops on the hook.


I draw yarn through all four loops and my cluster is made!


Beginning dc-4-tog: I start with ch 2 (which counts as 1st dc), then I make three more unfinished double crochets into the same beginning space. I have four loops on the hook. 


I draw yarn through all four loops. The cluster is made!


Dc-4-tog: I work four unfinished double crochets into the same space. Now I have five loops on the hook.


And I draw yarn through all five loops. 


Beginning tr-5-tog: to make this cluster, I start with ch 3 (counts as 1st tr), I make another unfinished tr into the same space.


And I make three more unfinished tr into the same space. I now have five loops on the hook.


I draw yarn through all of them. Cluster is made!


Tr-5-tog: I make five unfinished treble crochets into the same space. I have six loops on the hook.


I draw yarn through all six loops. 


Here is a row of my tr-5-tog clusters. 


And now I'll show you how to make two tr-5-tog clusters into the same space. 

I make a beginning tr-5-tog. 


Ch 5.


And I make another tr-5-tog cluster into the same space.


And again, tr-5-tog, ch 3, tr-5-tog all in same space.


Don't they look lovely?


Wow, that was lots of photos. I hope they will be helpful to my fellow crocheters!

Have a wonderful weekend!


I'm linking to
Link Your Stuff @ Annamarie's Haakblog
Crafting Along @ Be a Crafter

Friday, September 11, 2015

Lacy Vintage Bonnet, Free Crochet Pattern


I made this bonnet following a vintage pattern from Crochet for Your Baby and Knit Too! Star Baby Book 130 by American Thread Company, 1956.


I used a small amount of leftover category 1 yarn from my stash. I'm not sure what size hook I used. I just went alone with a steel hook that felt comfortable for this yarn. It's a vintage hook, and all it says on it is "Boye 1", and on the other side "U.S.A. 10 cents".

The finished size in the original pattern is 6 months, but my bonnet came out about the size 0-3 months. It fits my 20 inch doll perfectly. 


I post the pattern exactly as it appears in the original publication. However, I added a few notes of mine. 
In third rounds all it says is to increase 6 dc. So in green font in parenthesis, I wrote how exactly I made my increases.
Also I started my sixth round with a chain; I also indicated that in green font.

Otherwise, the pattern was easy to follow and I made my bonnet in one evening.   


Chain (ch) 4, join to form a ring, ch 3 [counts as 1 double crochet (d c)], 13 d c in ring, join.

2nd Row. Ch 3, d c in same space, * 2 d c in next d c, repeat from * all around, join in 3rd stitch (st) of ch (28 d c).

3rd Row. Ch 3 and working in d c, increase 6 d c evenly spaced (34 d c). (ch 3, dc in next 2 dc, 2 dc in next dc, *dc in next 3 dc, 2 dc in next dc* 5 times, dc in last 4 dc)

4th Row. Ch 3, d c in same space, ch 1, 2 d c in same space, * skip 1 d c, 2 d c in next d c, ch 1, 2 d c in same space (shell), repeat from * all around, join in 3rd st of ch (17 shells).

5th Row. Slip stitch (sl st) in ch 1 space, ch 3, d c in same space, ch 1, 2 d c in same space, * 2 d c in next ch 1 space, ch 1, 2 d c in same space, repeat from * all around, join.

6th Row. (ch 1) 1 single crochet (s c) in same space, 1 s c in each of the next 7 d c, ch 3, shell in center of next shell, * shell in center of next shell, repeat from * 11 times (13 shells), ch 3, skip 2 d c, s c in next d c, 1 s c in each of the next 7 d c, do not join, place a marker at beginning of each row.

7th Row. 1 s c in each of the next 8 s c, 2 s c over next ch 3 loop, * shell in next shell, repeat from * 12 times, 2 s c over next ch 3 loop, 1 s c in each of next 8 s c.

8th Row. 1 s c in each of the next 10 s c, ch 3, * shell in next shell, repeat from * 12 times, ch 3, 1 s c in each remaining 10 s c.

9th Row. 1 s c in each of the next 10 s c, 2 s c over next ch 3 loop, ch 3, * shell in next shell, repeat from * 12 times, ch 3, 2 s c over next ch 3 loop, 1 s c in each remaining 10 s c.

10th Row. 1 s c in each of the next 12 s c, 2 s c over next ch 3 loop, ch 3, * shell in next shell, repeat from * 12 times, ch 3, 2 s c over next ch 3 loop, 1 s c in each remaining 12 s c.

11th Row. 1 s c in each of the next 14 s c, 2 s c over next ch 3 loop, ch 3, * shell in next shell, repeat from * 12 times, ch 3, 2 s c over next ch 3 loop, 1 s c in each remaining 14 s c.

12th Row. 1 s c in each of the next 16 s c, 2 s c over next ch 3 loop, ch 3, * 3 d c in center of next shell, ch 1, 3 d c in same shell, s c between shells, repeat from * 12 times, ch 3, 2 s c over next ch 3 loop, 1 s c in each remaining 16 s c.


13th Row. 1 s c in each of the next 18 s c, 2 s c over next ch 3 loop, ch 3, * 3 d c, ch 1, 3 d c (shell) in center of next shell, ch 2, s c in s c between shells, ch 2, repeat from * 12 times but ending with ch 3, 2 s c over next ch 3 loop, 1 s c in each remaining 18 s c, join, cut yarn. Lace ribbon through shells of 11th row. Trim with ribbon rosettes as illustrated.


Tuesday, September 1, 2015

Small Peach Doily and Vintage Tablecloth Pattern


This small doily is actually a vintage tablecloth motif from New Ideas in Crochet, Table Topics, Book No.123 by The Spool Cotton Company, 1938.

I made mine with size ten crochet thread and 1.25 mm steel hook. My doily came out 6 inches in diameter (across). But here are a couple more ideas: using thicker cotton yarn you can make beautiful round table mats; or use super bulky cotton yarn, and you can make a lovely doily rug.   


I post the pattern below exactly as it appears in the original publication. 

Starting at center, ch 8, join with sl st to form a ring.

1st rnd: Ch 5, *dc in ring, ch 2. Repeat from * 6 more times. Join last ch-2 with sl st to 3rd st of ch-5 first made (8 sps). 

2nd rnd: Sl st in ch-2 sp, ch 3, 2 dc in same sp, ch 2, *3 dc in next sp, ch 2. Repeat from * around. Join last ch-2 with sl st to 3rd st of ch-3 first made. 

3rd rnd: Ch 3, dc in same place as sl st, *dc in next dc, 2 dc in next dc, ch 2, 2 dc in next dc. Repeat from * around ending wtih ch 2. Join to 3rd st of ch-3 first made.

4th rnd: Ch 3, dc in same place as sl st, *dc in each of next 3 dc, 2 dc in next dc, ch 2, 2 dc in next dc. Repaet from * around, ending with ch 2. Join.

5th rnd: Ch 3, dc in same place as sl st, *dc in each of next 5 dc, 2 dc in next dc, ch 3, 2 dc in next dc. Reapt from * around, ending with ch 3. Join. 

6th rnd: Sl st in next dc, ch 3, * dc in each of next 6 dc, ch 3, sc in ch-3 sp, ch 3,skip 1 dc, dc in next dc. Repeat from * around, ending with ch 3. Join.

7th rnd: Sl st in next dc, ch 3, *dc in each of next 4 dc, ch 4, sc in ch-3 sp, sc in next sc, sc in next ch-3 sp, ch 4, skip 1 dc, dc in next dc. Repeat from * around. Join.

8th rnd: Sl st in next dc, ch 3, *dc in each of next 2 dc, ch 5, sc in next ch-4 sp, sc in each of next 3 sc, sc in next sp, ch 5, skip 1 dc, dc in next dc. Repeat from * around, ending with ch 5. Join. 

9th rnd: Sl st in next dc, ch 3, 2 dc in same place as sl st, holding back the last loop of each dc on hook; thread over and draw through all loops on hook, ch 1 to fasten (thus a 3-dc cluster is made - counting ch-3 as 1 dc); *ch 6, sc in ch-5 loop, sc in each of next 5 sc, sc in next loop, ch 6, skip 1 dc, 3-dc cluster in next dc. Repeat from * around, ending wtih ch 6, sl st in tip of 1st cluster made. 

10th rnd: Sc in same place as sl st, **ch 5, skip 3 sc, tr in next sc, *ch 2, tr is same sc. Repeat from * 2 more times, ch 5, sc in tip of next cluster. Repeat from ** around, ending with ch 5. Join.

11th rnd: Ch 6, dc in same place as sl st, *ch 3, 4 sc in ch-5 loop, sc in next ch-2 space, ch 3; in next ch-2 sp make dc, ch 3, dc; ch 3, sc in next ch-2 sp, 4 sc in next ch-5 loop, ch 3; in next sc make dc, ch 3, dc. Repeat from * around, ending with ch 3. Join with sl st to 3rd st of ch-6 first made.

12th rnd: Sl st in ch-3 sp, ch 6, dc in same sp, *ch 3, sc in next ch-3 sp, ch 2, skip 2 sc, sc in next sc, ch 2, sc in next sp, ch 3; in next ch-3 sp (between dc's) make dc, ch 3, dc. Repeat from * around, ending with ch 3, sl st in 3rd st of ch-6 first made. Fasten and break off. This completes one motif.   


And here is what a tablecloth made out of such motifs looks like. The instructions on how to make the tablecloth are below. 

Photo Credit: New Ideas in Crochet, Table Topics, Book No.123 by The Spool Cotton Company, 1938. 

Make 16 x 20 motifs, and sew together on wrong side with neat over-and-over stitches, joining 2 points of each motif to 2 points of adjacent motifs, leaving 2 points free on each motif, between joinings, to be filled in later. 

Fill-in Lace... Ch 8, join with sl st to form ring. 

1st rnd: Ch 5, *dc in ring, ch 2. Repeat from * 6 more times. Join with sl st to 3rd st of ch-5 first made (8 sps). 

2nd rnd: Sc in same place as sl st, *ch 18, sc at joining of 2 motifs, ch 18, sc in same place as 1st sc was made, sc in next sp, ch 9, sc in next point on motif, ch 9, sc in same sp on ring where last sc was made, sc in next sp, ch 9, sc in next point, ch 9, sc in same sp on ring where last sc was made, sc in next dc. Repeat from * around. Join with sl st. Fasten and break off.